Copy and Restore Past Schoology Courses: Difference between revisions
Appearance
| Line 44: | Line 44: | ||
#Delete—This option allows you to delete the resource from your Resources. This action cannot be undone. | #Delete—This option allows you to delete the resource from your Resources. This action cannot be undone. | ||
== Step 4 - Adding Material from Resources into your new ( | == Step 4 - Adding Material from Resources into your new (2021-2022) Courses == | ||
First, navigate to your new course. (Note, | First, navigate to your new course. (Note, 2021-2022 Courses won't be available until end of August 2019.) Then follow these directions to add old course material: | ||
[[File:Adding_from_Resources1.jpg||thumbnail]] <br clear="all"> | [[File:Adding_from_Resources1.jpg||thumbnail]] <br clear="all"> | ||
Revision as of 16:40, 27 July 2021
| How to save past year's Schoology courses to Resources in order to access those materials for current and future courses. | |
| Intended for Employees and Students | |
| Categorized under Classroom technology and systems | |
| Maintained by Matt Ringh | |
| in need of review. |
Step 1 - Setup a new Collection to keep your Resources Organized
- Click Resources in the top menu and then select Personal from the list.
- Click the file cabinet icon to create a new Collection.

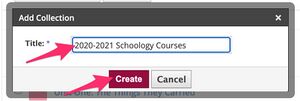
- Name the collection "2020-2021 Schoology Courses", and click "Create".
Step 2 - Save your old Course Materials to Resources
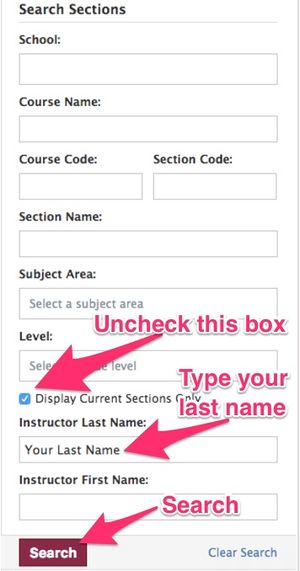
- Start by navigating to your course home page. Click "Courses" in the top menu. Then click "My Courses" in the top-right corner of the screen. Scroll down a bit and then follow these directions, which are illustrated in the picture to the right.
- Deselect/uncheck the box for "Display current sections only".
- Enter your last name in the search field to the right.
- Search
- You will now see every course you've ever had in Schoology.
- Click into the Course you want to save to your resources.
- Click the "Options" button (just to the right of the "Add Materials" button), and Select "Save Course to Resources".
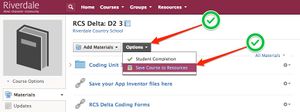
- In the first drop-down menu, select the desired collection ("2018-2019 Schoology Courses", for example.)
Step 3 - Editing your Course Materials from Resources
Edit Resources
There is a Gear Icon to the right of every resource. The Gear Icon allows you to Edit, Move, Copy, or Delete a resource.
- Edit—This option allows you to change the title of your resource, as well as to add notes that will only appear in your Resources.
- Copy to—This option allows you to "copy and paste" the resource into another location in your Resources.
- Move to—This option allows you to "cut and paste" the resource into another location in your Resources.
- Delete—This option allows you to delete the resource from your Resources. This action cannot be undone.
Step 4 - Adding Material from Resources into your new (2021-2022) Courses
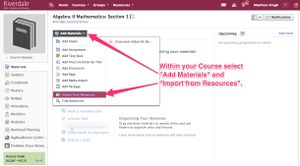
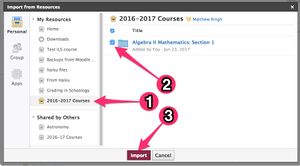
First, navigate to your new course. (Note, 2021-2022 Courses won't be available until end of August 2019.) Then follow these directions to add old course material:
| Article | Summary |
|---|---|
| Create Google Doc Assignments in Schoology | |
| Use remote learning procedures (for faculty) | An overview of procedures for working remotely during extended school closure. |
| Use remote learning procedures (for students) | An overview of procedures for working remotely during extended school closure. |
| Master remote learning? | An overview of procedures for working remotely during extended school closure. |
| Assess Student Learning Remotely Using SMART Notebook? | Create formative assessments using SMART Notebook’s response 2 wizard and convert files from previous versions of SMART Response. |
| Use Zoom Video Conferencing for Remote Learning? | Zoom is a remote conferencing program similar to Google Hangouts Meet. It provides a remote learning service that provides audio, video, content sharing, annotation, video clip sharing, breakout rooms, polling, recording and more. |