Use Zoom Video Conferencing for Remote Learning?
Zoom is a remote conferencing program which provides a remote learning service that combines video conferencing, online meetings, chat, content sharing, and mobile collaboration.
| Zoom is a remote conferencing program similar to Google Hangouts Meet. It provides a remote learning service that provides audio, video, content sharing, annotation, video clip sharing, breakout rooms, polling, recording and more. | |
| Intended for Employees and Students | |
| Categorized under Classroom Technology and Systems | |
| Maintained by Matt Ringh | |
| in need of review. |
Zoom vs Meet - which is the right choice for me?
Google Hangouts Meet and Zoom are both video conferencing services and, at their core, they offer similar features. Hangouts would be your choice if you're looking for simplicity. Hangouts works entirely over the web, with an account you already have. Zoom requires you to download an app (see details below), which boosts Zoom's features (listed below), but if you find that you don't need those features, stick with Hangouts.

Zoom best practices / quick guide
We know there's a ton to process here! If you are familiar with Zoom and just want to know how we suggest you setup a meeting, read this section.
Lower School
Middle/Upper School
Password protect a meeting, and share the password securely When you create a Zoom Meeting the meeting password will be encrypted and included in the join meeting link to allow participants to join with just one click without having to enter the password.
Create Waiting Rooms for attendees
Manage participants
Require host to be present before meeting starts
Disable all participants to record
Only allow individuals with a given e-mail domain to join (when possible)
No personal accounts, please. Only use RCS Email linked Zoom accounts for Riverdale work
If you choose to use Zoom, and you happen to have a personal Zoom account (i.e. one tied to a personal/non-RCS email account), we ask that you don't this personal account for instruction at Riverdale. Please only use your Riverdale Zoom account for all interactions at Riverdale.
Getting an RCS Zoom Account
Riverdale has Basic accounts with the 40-minute meeting limit lifted for all Employees. To get an RCS Zoom account:
- Navigate to https://riverdale.zoom.us
- Click "Sign In"
- Choose your Riverdale.edu email account to sign in with
- Poof! Your account has been created!
Those of you who have an existing (free) Zoom account, please follow these instructions to switch it to Riverdale's new Zoom account.
- Navigate to https://riverdale.zoom.us
- Click "Sign In"
- Choose your Riverdale.edu Email account to sign in with
- When prompted select to switch to our community!

Zoom Clients
If you are using a non-RCS device, you can find the Hardware requirements for Zoom here: https://support.zoom.us/hc/en-us/articles/201362023-System-Requirements-for-PC-Mac-and-Linux
Please check the requirements to ensure your non-RCS device is appropriate before instructing or learning with Zoom at RCS.
New to Zoom (Mac)? - Installing Zoom via Self Service
If you're new to Zoom, and you're using a Mac Laptop, you can install Zoom through Self Service. If you don't have Self Service on your Mac, read this article for instructions on how to enroll.

New to Zoom (Windows)? - Installing Zoom
You can install Zoom from the Zoom Download Center.
Using the Web Client
If you are joining a meeting but do not want to install the Zoom client, you can use Zoom from your web browser. After you're prompted to download the client, you should see a link at the bottom of the web page, allowing you to go to join the meeting in the browser. Note: this will not work on a mobile device.

Smartphones and Tablet Clients
To use Zoom from your Smartphone or Tablet, you must install the Zoom Client from the appropriate App Store (Apple App Store | Android). RCS-issued iPads should already have the Zoom client installed, or you can download it from Self-Service.
Testing your Zoom Client
If you'd like to test your Zoom Client install before joining a meeting, you can do so at https://zoom.us/test
Updating your Zoom Client
How to update:
- Mac: You can find the new version of the Zoom client in SelfService
- All other clients (Non-Self Service Macs, Windows, iOS) can find instructions for updating their Zoom client here.
Scheduling a Zoom Meeting
Zoom has a great overivew on scheduling Zoom meetings here: https://support.zoom.us/hc/en-us/articles/201362413-Scheduling-meetings
Adding an Alternate Host
Faculty who team teach or work together to facilitate a class should add said co-teacher as an alterate host. This will allow either teacher to begin the meeting. This quick video shows you how to add an alternate host to an already created meeting.
Placing Video Conference links in Google Calendar for every occurrence of a class
Here's a link to a video which will take you through the process of placing a Zoom link in Google Calendar Events for you and your students.
Quick Overview of Host Controls in a Zoom Meeting
Host controls allow you as the host to control various aspects of the Zoom Meeting, such as managing the participants. Please Watch this Video for an overview of how this works.
Also helpful is Zoom's 44:00 Webinar on using Zoom in Education
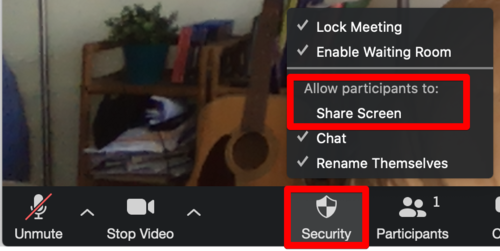
Zoom April 8 In-Meeting Security Controls
These controls include:
- Lock Meeting: Locks the meeting, keeping new participants from joining the meeting.
- Enable Waiting Room: Enables Waiting Room for incoming new participants or to move current participants into the Waiting Room.
- Allow (or dis-allow!) participants to:
- Share Screen: Allows participants to start Screen Shares
- Chat: Allows participants to use the chat function.
- Rename Themselves: Allows participants to rename themselves from the Participants panel.
We made a short video to explain these controls if you learn better by listening and seeing.
Muting/Unmuting Audio and Video
On the Zoom menu bar you can easily mute/unmute your audio, and disable/enable video.

The Participants Panel will allow you to select a specific participant to mute. To mute a specific participant, hover over the participant's name and the “Mute” button will appear. Select the “Mute” button to turn off the participant's audio. See more on participant management in the section below.
Participant and Meeting Management
Hosts and co-hosts can click Manage Participants in the host controls bar to display the participants list:

Click the drop-down menu located at the top-left corner to close the participants list or click Pop Out to separate the participants list from the meeting window:

Hover over a participant and click More for these options:

Chat: Open the chat window to send messages directly to the panelist.
Stop Video: Stop the participant's video stream so they are unable to start their video. If the participant hasn't started their video, you will see the Ask to Start Video option.
Make Co-Host (only available to the host): Assign a co-teacher to be a co-host.
Assign to type Closed Caption (only available to the host): Assign the attendee to type closed caption during the meeting.
Rename: Change the attendee name that is displayed to other participants. This change only applies to the current meeting.
Remove: Dismiss a participant from the meeting. They won't be able to rejoin unless you allow participants and panelists to rejoin.
You will also have access to enable or disable these options at the bottom of the participants list:

Mute All / Unmute All: Mute or unmute all participants currently in the meeting.
Mute participants on entry: Automatically mute participants as they join the meeting.
Allow participants to unmute themselves: Participants can unmute themselves if they want to speak to others in the meeting.
Allow participants to rename themselves: Participants can change their screen name displayed to other participants.
Play enter/exit Chime: Play a sound when participants join and leave the meeting
Lock meeting: Don't allow other participants to join the meeting in progress. See more information on this below.
Prevent Unwanted Zoom Participants
Once in a meeting, uninvited guests can listen in on discussions, capture screenshots of shared content, and even disrupt the meeting with unwanted video, audio, or shared content.
If someone you don't know shows up in your meeting, you should take it seriously; it's possible that these incidents may constitute a phishing attempt to obtain confidential information or access to RCS services.
Set a Meeting Password
Setting a Meeting Password is such an effective way to keep non-community members out of Zoom Meetings, we've required all RCS meetings created after March 27 to be automatically created with a password. This cannot be turned off and the password cannot be removed - only changed. To find the password for your meeting:
- Log into zoom at https://riverdale.zoom.us ,
- Click on "Meetings" in the side-bar
- Choose the meeting from your list whose password you're unsure of
- Click on the name of that meeting
- You will see the Meeting Password on the information screen.
If you created the meeting before March 27 and would like to set a password, please follow the instructions above and choose "Create a Meeting Password" on the Meeting information screen.
Lock the meeting
It’s always smart to lock your front door, even when you’re inside the house. When you lock a Zoom Meeting that’s already started, no new participants can join, even if they have the meeting ID and password (if you have required one).
- In the meeting, the "Security"
- In the pop-up, click "Lock Meeting". There will now be a check mar next to "Lock Meeting"
.png)
Waiting Rooms
The Waiting Room is a helpful feature for hosts to control who comes and goes. If you have Waiting rooms enabled on a meeting, you can go here to see Zoom's documentation on using them.
You can also enable or dis-able a waiting room from the Zoom In-Meeting Security Menu once the meeting has started using the In-Meeting Host Security Menu.

Renaming Participants
You can lock participants from renaming themselves during. meeting using the in-meeting Security Controls.

Familiarize yourself with your Zoom settings
Understand how to protect your virtual space when you need to. You can access Zoom Settings and features here.
- Remove unwanted or disruptive participants: From that Participants menu, you can mouse over a participant’s name, and several options will appear, including Remove. Click that to kick someone out of the meeting.
- Allow removed participants to rejoin: When you do remove someone, they can’t rejoin the meeting. But you can toggle your settings to allow removed participants to rejoin, in case you boot the wrong person.
How to Keep the Party Crashers from Crashing Your Zoom Event - Zoom Blog
This Zoom Blog goes into a little more detail than we did in this HowDoI article.
Breakout Rooms
Breakout rooms allow you to split your Zoom meeting in up to 50 separate sessions. The meeting host can choose to split the participants of the meeting into these separate sessions automatically or manually, and can switch between sessions at any time.
If you're not yet sharing your screen, you can create Breakout groups by clicking on "Breakout Rooms".

Note: If you are sharing your screen, the option for Breakout Rooms can be found by clicking "More" at the top of your screen.

After clicking Breakout Rooms, all participants remain in the main meeting. You will see a pop up window which will allow you to Choose the number of Groups.

If you choose to create the breakout rooms Manually, you will get the option to select and assign each participant to a particular group.

Options for Breakout Rooms
After creating the breakout rooms, click Options to view additional Breakout Rooms options.

Check any options that you would like to use for your breakout rooms.
Move all participants into breakout rooms automatically: Checking this option will move all participants into the breakout rooms automatically. If this option is unchecked, the participants will need to click Join to be added to the breakout room.
Allow participants to return to the main session at any time: If this option is checked, the participants can move back to the main session from their meeting controls. If this is disabled, they need to wait for the host to end the breakout rooms.
Breakout rooms close automatically after x minutes: If this option is checked, the breakout rooms will automatically end after the configured time.
Notify me when the time is up: If this option is checked, the host will be notified when the breakout room time is up.
Countdown after closing breakout rooms: If this option is checked, the participants will be given a countdown of how much time they have left before being returned to the main room.
How to prevent participants from screen sharing
- Choose the "Security" Icon after you've started your meeting.
- Toggle Screensharing "On" or "Off" with the "Screen Share" option. If there is a check-mark next to "Screen Share", participants can screen share. If there is no check mark, participants cannot screen share.

In Meeting Chat
The in-meeting chat allows you to send chat messages to other users within a meeting. You can send a private message to an individual user or you can send a message to an entire group. As the host, you can choose who the participants can chat with or to disable chat entirely. In-meeting chat can be saved manually or automatically.
- While in a meeting, click Chat in the meeting controls.

- This will open the chat on the right. You can type a message into the chat box or click on the drop down next to To: if you want to send a message to a specific person.

- When new chat messages are sent to you or everyone, a preview of the message will appear and Chat will flash orange in your host controls.

Turn off In-Meeting Chat
You can turn chat on and off in your meeting by choosing the "Security" button and then using the "Chat" item to toggle Chat on or off. Chat will be on if there is a check-mark next to "Chat", and off if there is no check mark.

Annotating and Sharing Controls
Annotation tools You will see these annotation tools:

Note: The Select, Spotlight, and Save options are only available if you started the shared screen or whiteboard.
Mouse: Deactivate annotation tools and switch to your mouse pointer. This button is blue if annotation tools are deactivated.
Select (only available if you started the shared screen or whiteboard): Select, move, or resize your annotations. To select several annotations at once, click and drag your mouse to display a selection area.
Text: Insert text.
Draw: Insert lines, arrows, and shapes.
Stamp: Insert predefined icons like a check mark or star.
Spotlight / Arrow: Turn your cursor into a spotlight or arrow.
- Spotlight (only available if you started the shared screen or whiteboard): Displays your mouse pointer to all participants when your mouse is within the area being shared. Use this to point out parts of the screen to other participants.
- Arrow: Displays a small arrow instead of your mouse pointer. Click to insert an arrow that displays your name. Each subsequent click will remove the previous arrow placed. You can use this feature to point out your annotations to other participants.
Eraser: Click and drag to erase parts of your annotation.
Format: Change the formatting options of annotations tools like color, line width, and font.
Undo: Undo your latest annotation.
Redo: Redo your latest annotation that you undid.
Clear: Delete all annotations.
Save (only available if you started the shared screen or whiteboard): Save all annotations on the screen as a screenshot. The screenshot is saved to the local recording location.
Accessing annotation tools if you started screen sharing After sharing your screen or whiteboard, annotation controls will display. If you don't see the annotation tools, click Annotate (if you are sharing your screen) or Whiteboard (if you are sharing a whiteboard).

Accessing annotation tools if you are viewing a shared screen Here's how students can annotate your screen while you're presenting, or vice versa. While viewing a shared screen or shared whiteboard, click View Options > Annotate at the top.

Enabling/Disabling Participant Annotation
If you started the shared screen or whiteboard, click More in the screen share controls for these annotation settings:
Allow/Disable participants annotation: Allow or prevent the participants from annotating on your shared screen.
Show/Hide Names of Annotators: Show or hide the participants' name when they are annotating. If set to show, the participant's name will briefly display beside their annotation.

How to Add Zoom Conferencing to a Calendar Event
Zoom for GSuite is a Google Suite Add-On for GMail and Google Calendar that allows you to easily schedule, join, manage, and customize Zoom meetings from Gmail and Google Calendar.

Key Features of the Zoom for GSuite Add-On
- Schedule a Zoom Meeting with details from an email, automatically adding the topic, attendees, and attachments based on subject, recipients, and sent documents.
- Automatically add Zoom Meeting details to your Google Calendar invitation with 1-click
- Customize meeting options like join with video on, join with audio muted, join before host, and more.
- Simplify the administration of Zoom to your whole organization with a centralized deployment and an easy installation process.
Step 1 - Install Zoom for GSuite from the G Suite Marketplace.

You will now see that the add-on has been added to your Google Calendar and Google Mail right sidebars.
Note: It may take a few minutes for the Zoom for GSuite icon to populate in the right sidebar of your Google Calendar.

Step 2 - Adding a Zoom meeting to a Google Calendar event from your calendar:
- Go to Google Calendar and create an event.
- Under the Guests tab, click Add guests and enter the email addresses.
- Under the Event Details tab, click Add conferencing and select Zoom Meeting.
- Click Save.
- Click Send to send the invites.
- Guests will receive an email with the event information and a link to the video meeting.

Step 3 - After you've installed Zoom for GSuite, please review your default meeting settings in Zoom here: https://zoom.us/profile/setting.
Make sure things are set the way you'd want them when you schedule meetings from Google Calendar.
You can always change settings on meetings you schedule through the Chrome Scheduling Extension by going here: https://zoom.us/meeting and clicking on the Name of the meeting you want to change settings for (Under "Topic"). From there, you can modify the meeting settings for an individual meeting.
Zoom Support Site during the COVID-19 pandemic
This is a special support site from Zoom which contains Demos, Tutorials, and a Blog for new users (like us!).