Capture and Record Screen Content: Difference between revisions
No edit summary |
|||
| Line 12: | Line 12: | ||
== Method 1 - Using QuickTime == | == Method 1 - Using QuickTime == | ||
This is a simple and fast way to record your screen on a Mac. QuickTime is already installed on your Mac, so all you need to do is open it, and follow these directions: | This is a simple and fast way to record your screen on a Mac. QuickTime is already installed on your Mac, so all you need to do is open it, and follow these directions: | ||
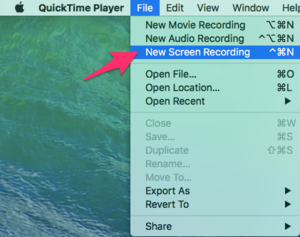
# Launch QuickTime Player and choose File, New Screen Recording | # Launch QuickTime Player and choose File, New Screen Recording[[File:QT1.png|thumbnail]] <br clear="all"> | ||
[[File:QT1.png|thumbnail]] <br clear="all"> | # Click the drop down menu next to the record button to select microphone options.[[File:QT2.png|thumbnail]] <br clear="all"> | ||
# Click the drop down menu next to the record button to select microphone options. | |||
[[File:QT2.png|thumbnail]] <br clear="all"> | |||
# Now when you click the record button, the screen will display the following directions (for choosing what part of the screen you want to record). | # Now when you click the record button, the screen will display the following directions (for choosing what part of the screen you want to record). | ||
[[File:QTDirections.png|thumbnail]] <br clear="all"> | [[File:QTDirections.png|thumbnail]] <br clear="all"> | ||
Once you're recording, you can stop recording by clicking the small "stop recording" button in your menu bar. It looks like this: | # Once you're recording, you can stop recording by clicking the small "stop recording" button in your menu bar. It looks like this:[[File:QT Stop.png|thumbnail]] <br clear="all"> | ||
[[File:QT Stop.png|thumbnail]] <br clear="all"> | |||
# Share your QuickTime recording by | # Share your QuickTime recording by | ||
##File->Save | ##File->Save | ||
Revision as of 21:09, 9 February 2018
| A screencast is a digital recording of computer screen output, also known as a video screen capture, often containing audio narration. | |
| Intended for Employees and Students | |
| Categorized under Classroom technology and systems | |
| Maintained by Matt Ringh | |
| in need of review. |
Method 1 - Using QuickTime
This is a simple and fast way to record your screen on a Mac. QuickTime is already installed on your Mac, so all you need to do is open it, and follow these directions:
- Launch QuickTime Player and choose File, New Screen Recording
- Click the drop down menu next to the record button to select microphone options.

- Now when you click the record button, the screen will display the following directions (for choosing what part of the screen you want to record).


- Once you're recording, you can stop recording by clicking the small "stop recording" button in your menu bar. It looks like this:

- Share your QuickTime recording by
- File->Save
- Drag the saved file into Google Drive.
- The video will be processed by Google, and available for viewing, usually within 15 minutes. It will be available for download by the person you share it with immediately.

Method 2 - Using ScreenCastify
This is a simple web-based solution which allows you to save your recordings directly to Google Drive.
| Article | Summary |
|---|---|
| Create Google Doc Assignments in Schoology | |
| Use remote learning procedures (for faculty) | An overview of procedures for working remotely during extended school closure. |
| Use remote learning procedures (for students) | An overview of procedures for working remotely during extended school closure. |
| Master remote learning? | An overview of procedures for working remotely during extended school closure. |
| Assess Student Learning Remotely Using SMART Notebook? | Create formative assessments using SMART Notebook’s response 2 wizard and convert files from previous versions of SMART Response. |
| Use Zoom Video Conferencing for Remote Learning? | Zoom is a remote conferencing program similar to Google Hangouts Meet. It provides a remote learning service that provides audio, video, content sharing, annotation, video clip sharing, breakout rooms, polling, recording and more. |