Capture and Record Screen Content: Difference between revisions
Appearance
No edit summary |
No edit summary |
||
| Line 18: | Line 18: | ||
# Now when you click the record button, the screen will display the following directions (for choosing what part of the screen you want to record). | # Now when you click the record button, the screen will display the following directions (for choosing what part of the screen you want to record). | ||
[[File:QTDirections.png|thumbnail]] <br clear="all"> | [[File:QTDirections.png|thumbnail]] <br clear="all"> | ||
== | Once you're recording, you can stop recording by clicking the small "stop recording" button in your menu bar. It looks like this: | ||
[[File:QT Stop.png|thumbnail]] <br clear="all"> | |||
# Share your QuickTime recording by | |||
##File->Save | |||
##Drag the saved file into Google Drive. | |||
##The video will be processed by Google, and available for viewing, usually within 15 minutes. It will be available for download by the person you share it with immediately. | |||
== Method 2 - Using ScreenCastify == | |||
This is a simple web-based solution which allows you to save your recordings directly to Google Drive. | |||
{{ClassTech}} | {{ClassTech}} | ||
Revision as of 21:05, 9 February 2018
| A screencast is a digital recording of computer screen output, also known as a video screen capture, often containing audio narration. | |
| Intended for Employees and Students | |
| Categorized under Classroom technology and systems | |
| Maintained by Matt Ringh | |
| in need of review. |
Method 1 - Using QuickTime
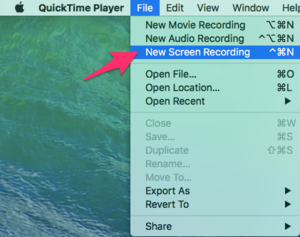
This is a simple and fast way to record your screen on a Mac. QuickTime is already installed on your Mac, so all you need to do is open it, and follow these directions:
- Launch QuickTime Player and choose File, New Screen Recording

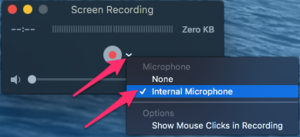
- Click the drop down menu next to the record button to select microphone options.

- Now when you click the record button, the screen will display the following directions (for choosing what part of the screen you want to record).

Once you're recording, you can stop recording by clicking the small "stop recording" button in your menu bar. It looks like this:

- Share your QuickTime recording by
- File->Save
- Drag the saved file into Google Drive.
- The video will be processed by Google, and available for viewing, usually within 15 minutes. It will be available for download by the person you share it with immediately.
Method 2 - Using ScreenCastify
This is a simple web-based solution which allows you to save your recordings directly to Google Drive.
| Article | Summary |
|---|---|
| Create Google Doc Assignments in Schoology | |
| Use remote learning procedures (for faculty) | An overview of procedures for working remotely during extended school closure. |
| Use remote learning procedures (for students) | An overview of procedures for working remotely during extended school closure. |
| Master remote learning? | An overview of procedures for working remotely during extended school closure. |
| Assess Student Learning Remotely Using SMART Notebook? | Create formative assessments using SMART Notebook’s response 2 wizard and convert files from previous versions of SMART Response. |
| Use Zoom Video Conferencing for Remote Learning? | Zoom is a remote conferencing program similar to Google Hangouts Meet. It provides a remote learning service that provides audio, video, content sharing, annotation, video clip sharing, breakout rooms, polling, recording and more. |