Set Up a Chromebook: Difference between revisions
Mvanmierlo (talk | contribs) No edit summary |
Mvanmierlo (talk | contribs) No edit summary |
||
| Line 61: | Line 61: | ||
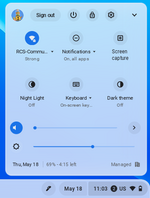
Open the menu on the bottom right of your Chromebook screen (where you change WiFi networks) and click on the '''''Screen capture''''' icon. Select the range you want to screenshot by clicking and dragging on your screen, and press '''''Enter''''' on your keyboard to take the screenshot. | Open the menu on the bottom right of your Chromebook screen (where you change WiFi networks) and click on the '''''Screen capture''''' icon. Select the range you want to screenshot by clicking and dragging on your screen, and press '''''Enter''''' on your keyboard to take the screenshot. | ||
[[File:ScreenshotCB2.png | [[File:ScreenshotCB2.png|thumb|198x198px|none]] | ||
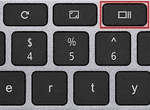
The keyboard shortcut is '''''CTRL + Shift + Windows.''''' See screenshot below for the location of the Windows button on the top row of your keyboard | The keyboard shortcut is '''''CTRL + Shift + Windows.''''' See screenshot below for the location of the Windows button on the top row of your keyboard | ||
[[File:WindowsKeyCB.png | [[File:WindowsKeyCB.png|thumb|150x150px|none]] | ||
== Installing Android Apps == | == Installing Android Apps == | ||
| Line 71: | Line 71: | ||
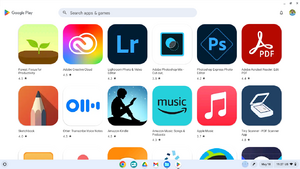
There are a lot of apps you can download for school use! Click on the '''''Google Play Store''''' after clicking on the Chromebook '''''Launcher''''' (bottom left of the screen), and see what you can install on your device! | There are a lot of apps you can download for school use! Click on the '''''Google Play Store''''' after clicking on the Chromebook '''''Launcher''''' (bottom left of the screen), and see what you can install on your device! | ||
[[File:PlayStoreCB.png| | [[File:PlayStoreCB.png|thumb|none]] | ||
Revision as of 14:47, 22 May 2023
| Some getting started tips on Chromebooks. | |
| Intended for Employees and Students | |
| Categorized under Classroom Technology and Systems and Chromebooks | |
| Maintained by Matthijs van Mierlo | |
| Up-to-date for the 2022-2023 school year. |
Basic Chromebook setup
- Turn on your Chromebook using the power button to the left of the keyboard
- Sign in to your Chromebook using your RCS username and passphrase
- If you're asked to, select an image for your user profile.
- Ensure you're on the RCS-Community Wi-Fi network.
- Click the status tray at lower right (it has the time and your battery life)
- If you see Connected to RCS-Guest, or Connected to RCS-Chromebook, click it, select RCS-Community, and enter your passphrase.
- Next update your Chromebook by following these instructions (in the Check for updates yourself section)
- Click Done when finished
- When your Chrome OS update is ready, you'll see an alert in your status tray. Restart your Chromebook to install the update
Learn helpful keyboard shortcuts
As with most operating systems, there are some very useful keyboard shortcuts that are worthwhile to explore. Some examples of keyboard shortcuts include:
| Description | Shortcut |
|---|---|
| Copy text | CTRL + C |
| Paste text | CTRL + V |
| Search for text | CTRL + F |
| Undo change | CTRL + Z |
| Redo change | CTRL + Y |
| Caps lock on/off | Search + Alt |
| Lock your screen | Search + L |
| View all shortcuts | CTRL + Alt + ? |
For a more extensive list of shortcuts, you can refer to Google's documentation here: https://support.google.com/chromebook/answer/183101?hl=en. The more keyboard shortcuts you know, the easier everything becomes!
You can also click CTRL + Alt + ? on your Chromebook keyboard to view ALL of the shortcuts you can use.
Capture or record your screen
It may be useful to take screenshots or to record your screen on the Chromebook. There are two easy ways to do this! One if through the notification tray menu (where you change WiFi networks), and the other is by using keyboard shortcuts.
Open the menu on the bottom right of your Chromebook screen (where you change WiFi networks) and click on the Screen capture icon. Select the range you want to screenshot by clicking and dragging on your screen, and press Enter on your keyboard to take the screenshot.

The keyboard shortcut is CTRL + Shift + Windows. See screenshot below for the location of the Windows button on the top row of your keyboard

Installing Android Apps
Once your Chromebook has been updated, you can use the Google Play Store. We have curated and tested a set list of apps for you to use. If you are hoping to use an app but cannot search for it in the Google Play Store, reach out to a member of the Tech Team at help desk or submit a ticket by emailing support-ticket@riverdale.edu.
There are a lot of apps you can download for school use! Click on the Google Play Store after clicking on the Chromebook Launcher (bottom left of the screen), and see what you can install on your device!
