Copy and Restore Past Schoology Courses: Difference between revisions
Mvanmierlo (talk | contribs) No edit summary |
|||
| (49 intermediate revisions by 3 users not shown) | |||
| Line 1: | Line 1: | ||
{{ | {{AboxNew | ||
| name = Archive, Archive and Restore Past Schoology Courses | |||
| learning = | |||
| instruction = x | |||
| community = | |||
| summ = Copy and use past Schoology resources | |||
| maintained = MR | |||
| year = 2024-2025 | |||
}} | }} | ||
== Why should I do this? == | |||
In many cases, course resources can be re-used from year-to-year, and Schoology has a easy, organized way to do just that. To copy course content from one course into another (ex. for a new school year), you first need to archive it and then restore it. Saving a course to '''''My Resources''''' (archiving it) makes a snapshot of all the assignments, quizzes, discussions, pages, and resources in a particular course and allows you to import that content to other Schoology courses you might be creating. | |||
The general process is as follows: | |||
# Setup a new '''''Collection''''' to keep your resources organized | |||
# Save your old course materials to '''''My Resources''''' | |||
# Edit your course materials from '''''My Resources''''' if needed | |||
# Add Material from '''''My Resources''''' into your new Schoology courses | |||
== Step 1 - Setup a new Collection to keep your Resources Organized == | |||
* Click '''''Resources''''' in the top menu and then select Personal from the list. | |||
== Step | * Click the '''''file cabinet''''' icon to create a new '''''Collection'''''. | ||
[[File:Collections in Resources.png|thumbnail|none]] | |||
* Name the collection "2021-2022 Schoology Courses", and click '''''Create'''''. | |||
[[File: | |||
[[File:Name and create new.jpg|thumbnail|none]] <br clear="all"> | |||
== Step 2 - Save your old Course Materials to Resources == | |||
[[File:How_to_search_for_your_courses.jpg|thumbnail]] | *Navigate to your Schoology home page. | ||
*Click '''''Courses''''' in the top menu. | |||
*Then click '''''My Courses''''' in the top-right corner of the screen. | |||
*Click the '''''Archived''''' tab. | |||
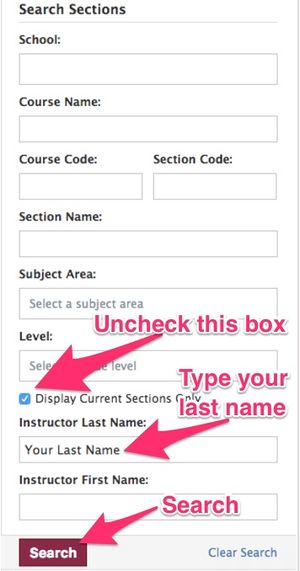
[[File:How_to_search_for_your_courses.jpg|thumbnail|none]] | |||
* You will now see every course you've ever had in Schoology. | |||
* Click into the Course you want to save to your resources. | |||
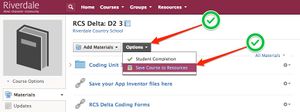
* Click the '''''Options''''' button (just to the right of the '''''Add Materials''''' button), and Select '''''Save Course to Resources'''''. | |||
[[File:Save to Resources.jpg|thumbnail|none]] | |||
* In the first drop-down menu, select the desired collection ("2018-2019 Schoology Courses", for example.) | |||
== Step 3 - Editing your Course Materials from Resources == | == Step 3 - Editing your Course Materials from Resources == | ||
| Line 57: | Line 46: | ||
There is a Gear Icon to the right of every resource. The Gear Icon allows you to Edit, Move, Copy, or Delete a resource. | There is a Gear Icon to the right of every resource. The Gear Icon allows you to Edit, Move, Copy, or Delete a resource. | ||
# | #'''''Edit'''''—This option allows you to change the title of your resource, as well as to add notes that will only appear in your Resources. | ||
#Copy | #'''''Copy to'''''—This option allows you to "copy and paste" the resource into another location in your Resources. | ||
#Move | #'''''Move to'''''—This option allows you to "cut and paste" the resource into another location in your Resources. | ||
# | #'''''Delete'''''—This option allows you to delete the resource from your Resources. This action cannot be undone. | ||
== Step 4 - Adding Material from Resources into your new (2022-2023) Courses == | |||
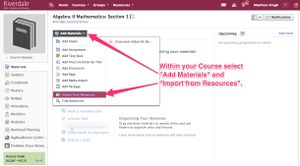
First, navigate to your new course. (Note, 2021-2022 Courses won't be available until end of August 2021.) Then follow these directions to add old course material: | |||
[[File: | [[File:Adding_from_Resources1.jpg|thumbnail|none]] | ||
[[File:Import.jpg|thumbnail|none]] <br clear="all"> | |||
Latest revision as of 14:36, 5 August 2024
 | |
|---|---|
 | |
| Summary | Copy and use past Schoology resources |
| Author | Maintained by Matt Ringh |
| Help | Get help with this article |
| Status | Up-to-date for the 2024-2025 school year. |
Why should I do this?
In many cases, course resources can be re-used from year-to-year, and Schoology has a easy, organized way to do just that. To copy course content from one course into another (ex. for a new school year), you first need to archive it and then restore it. Saving a course to My Resources (archiving it) makes a snapshot of all the assignments, quizzes, discussions, pages, and resources in a particular course and allows you to import that content to other Schoology courses you might be creating.
The general process is as follows:
- Setup a new Collection to keep your resources organized
- Save your old course materials to My Resources
- Edit your course materials from My Resources if needed
- Add Material from My Resources into your new Schoology courses
Step 1 - Setup a new Collection to keep your Resources Organized
- Click Resources in the top menu and then select Personal from the list.
- Click the file cabinet icon to create a new Collection.

- Name the collection "2021-2022 Schoology Courses", and click Create.

Step 2 - Save your old Course Materials to Resources
- Navigate to your Schoology home page.
- Click Courses in the top menu.
- Then click My Courses in the top-right corner of the screen.
- Click the Archived tab.

- You will now see every course you've ever had in Schoology.
- Click into the Course you want to save to your resources.
- Click the Options button (just to the right of the Add Materials button), and Select Save Course to Resources.

- In the first drop-down menu, select the desired collection ("2018-2019 Schoology Courses", for example.)
Step 3 - Editing your Course Materials from Resources
Edit Resources
There is a Gear Icon to the right of every resource. The Gear Icon allows you to Edit, Move, Copy, or Delete a resource.
- Edit—This option allows you to change the title of your resource, as well as to add notes that will only appear in your Resources.
- Copy to—This option allows you to "copy and paste" the resource into another location in your Resources.
- Move to—This option allows you to "cut and paste" the resource into another location in your Resources.
- Delete—This option allows you to delete the resource from your Resources. This action cannot be undone.
Step 4 - Adding Material from Resources into your new (2022-2023) Courses
First, navigate to your new course. (Note, 2021-2022 Courses won't be available until end of August 2021.) Then follow these directions to add old course material:

