Enable/disable call forwarding on my phone
Appearance
 | |
|---|---|
 | |
| Summary | How to enable/disable call forward on my phone |
| Author | Maintained by Brian Clough |
| Help | Get help with this article |
| Status | Up-to-date for the 2025-2026 school year. |
What is Call Forward
Call Forward redirects incoming calls to your voice mailbox (by default) or to an alternate number. Choose from the following Call Forward options:
- Call Forward – Always: redirects all incoming calls
- Call Forward – No Answer: redirects calls if you don’t answer after the programmed number of rings (1–10)
- Call Forward – Busy: redirects calls when all lines are busy.
All Call Forward options are OFF by default. You can turn on Call Forward No Answer and Call Forward Busy at the same time.
Note: You cannot change your Call Forward settings while on a call.
Program Call Forward
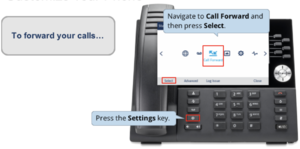
6930 Phones
- Click on Settings (Gear Icon)
- Use the navigation ring and scroll over to Call Forward and press Select

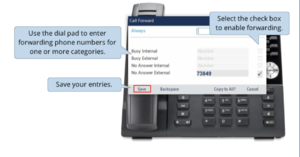
- Use the Dial Pad to enter the forwarding for one or more categories
- Select the check box to enable call forwarding
- Save the entries

RingCentral desktop Application
- Click on Settings > Phone > Call Rules and Voicemail > Forward All Calls and make sure the option is clicked on. To modify the destination of forwarded calls click on the option and select Forward the Call from the dropdown for Incoming Calls. Make sure to save all changes before exiting the Settings.
RingCentral mobile Application
- Click on Phone (bottom bar) > Settings (Gear icon in the upper-right) > Call rules and voicemail > Forward all calls and make sure the option is clicked on. To modify the destination of forwarded calls click on the option and select Forward the Call from the dropdown for Incoming Calls. Make sure to save all changes before exiting the Settings.