Update Google Account Photo
| The Google Account photo shows up in the upper-right of your GMail window, and presents to recipients of your emails as well as in other locations. | |
| Intended for Employees and Students | |
| Categorized under Google and Classroom technology and systems | |
| Maintained by Jeffrey Gomez | |
| in need of review. |
Summary
- We are updating every employee's Google Account photo to be the same as their new RCS ID photo. The Google Account photo shows up in the upper-right of your GMail window, and presents to recipients of your emails as well as in other locations. It might take up to a day for the change to be seen all over (due to browser caching and stuffs).
Things you want to ask right now
How often are you doing this
- Just once per year, after the ID photos are taken in September.
Can I change the picture to something else
- We know you might not love your ID photo, or have some amazing photo of yourself to share :) Feel free to change the photo whenever you like, just make sure it identifies you to others.
Are you doing student photos too
- We are NOT planning to do this for students for privacy reasons.
How many Google photos of me are there
- Google is a bit sneaky, and actually has THREE places they store your photo. If they are all the SAME now, then they'll all change together during our update. We can update one which updates the other (Google+, but who uses that!?) but a third one is actually hiding in your GMail Settings and it's hit or miss whether our process updates it. If you need to change that one, go to GMail Settings / General and scroll down to My Picture.
I LOVE my current photo, don't replace it
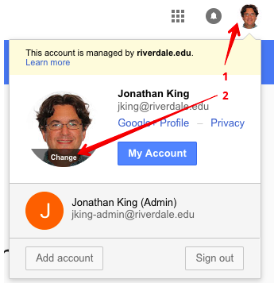
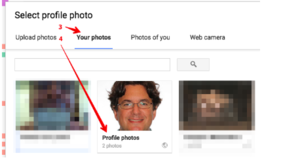
- Using the steps below, you can reset your photo to a former one, or save it for your own use.
- From the next window you can choose to use or save a former profile photo.
5. Right-Click or Control-Click and choose Save Image As…
6. Save it

