Copy and Restore Past Schoology Courses: Difference between revisions
Appearance
No edit summary |
No edit summary |
||
| Line 34: | Line 34: | ||
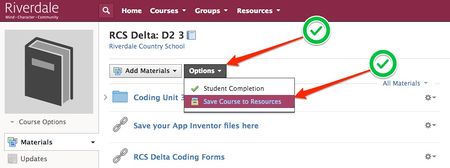
b) Click Options, and Select Save Course to Resources. | b) Click Options, and Select Save Course to Resources. | ||
[[File:Save to Resources.jpg| | [[File:Save to Resources.jpg|450px]] | ||
c) In the first drop-down menu, select the desired collection. | c) In the first drop-down menu, select the desired collection. | ||
===Preview (Settings to change)=== | ===Preview (Settings to change)=== | ||
Revision as of 16:46, 6 June 2017
| How to save past year's Schoology courses to Resources in order to access those materials for current and future courses. | |
| Intended for Employees and Students | |
| Categorized under RCS software and services | |
| Maintained by Matt Ringh | |
| in need of review. |
Saving old Schoology course in order to reuse some of the material next year
This page will help you save your current, or archived, Schoology courses to your Personal Resources, and will also teach you how to keep your Resources organized using Collections and Folders.
Step 1 - Setup a new Collection to keep your Resources Organized
a) Click Resources in the top menu and then select Personal in the list.
b) Click the file cabinet icon to create a new Collection.
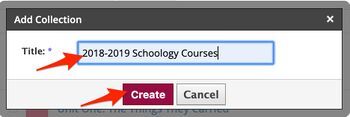
c) Name the collection "2016-2017 Schoology Courses", and click "Create".
Step 2 - Save Course Materials to Resources
a) Go to your course’s home page.
Note: If the grading period has ended, you can access an archived course by following these steps:
- Click Courses in the top menu.
- Select See All in the bottom-right corner.
- Select Archived to see a complete list of archived courses sorted by grading period.
b) Click Options, and Select Save Course to Resources.
c) In the first drop-down menu, select the desired collection.


