Access Schoology: Difference between revisions
Mvanmierlo (talk | contribs) No edit summary |
Mvanmierlo (talk | contribs) No edit summary |
||
| (One intermediate revision by the same user not shown) | |||
| Line 6: | Line 6: | ||
| summ = Schoology is our LMS, use this article to learn about settings, configurations, and more | | summ = Schoology is our LMS, use this article to learn about settings, configurations, and more | ||
| maintained = MV | | maintained = MV | ||
| year = | | year = 2024-2025 | ||
}} | }} | ||
__TOC__ | __TOC__ | ||
| Line 14: | Line 14: | ||
All Grade 4 and 5 students will be logging in to Schoology. Families will not be logging in at this time. | All Grade 4 and 5 students will be logging in to Schoology. Families will not be logging in at this time. | ||
== Schoology for Teachers == | == Schoology for Teachers == | ||
=== Quick Tutorials: === | |||
# [https://www.iorad.com/player/2414129/Schoology---Rearrange-Course-List Rearrange Schoology Course Tiles] | |||
# [https://www.iorad.com/player/2414152/Schoology---Create-assignment Create Schoology Assignment] | |||
# [https://www.iorad.com/player/2414195/Schoology---Configure-gradebook-settings Configure Schoology Gradebook] | |||
# [https://www.iorad.com/player/2414225/Schoology---Create-Google-assignments Create Google Assignments] | |||
# [https://www.iorad.com/player/2414240/Schoology---Manage-enrollment--admin-rights--view-course-as-a-student Manage Schoology Enrollment (Admin, etc.)] | |||
# [https://www.iorad.com/player/2414295/Schoology---Organize-course-content-and-materials Organize Schoology Material] | |||
=== Open Schoology === | === Open Schoology === | ||
Latest revision as of 10:06, 19 August 2024
 | |
|---|---|
| Summary | Schoology is our LMS, use this article to learn about settings, configurations, and more |
| Author | Maintained by Matthijs van Mierlo |
| Help | Get help with this article |
| Status | Up-to-date for the 2024-2025 school year. |
Schoology is our Learning Management System at Riverdale. Teachers will use Schoology to post material for their classes, and students will use Schoology to complete assignments, tests, quizzes, and access other classroom resources. Read below for more information about using Schoology, creating different assignments, and submitting different types of resources.
All Grade 4 and 5 students will be logging in to Schoology. Families will not be logging in at this time.
Schoology for Teachers
Quick Tutorials:
- Rearrange Schoology Course Tiles
- Create Schoology Assignment
- Configure Schoology Gradebook
- Create Google Assignments
- Manage Schoology Enrollment (Admin, etc.)
- Organize Schoology Material
Open Schoology
- Go to my.riverdale.edu
- Log in using your Riverdale username and passphrase
- Click on the Schoology icon
- You should then be logged in automatically.
Alternatively, you can also go directly to learning.riverdale.edu and Sign-in with Google
Access Current Courses
- Click on Courses at the top of the Schoology window
- Click on your course you want to open
- If you course doesn't appear in the list, click on Courses and then My Courses at the top right of the window
Reorder Courses List
- Click on Courses in Schoology
- Click on My Courses at the top right of the window
- Click Reorder courses on the right hand side of the window
- Click and drag courses to reorder them in the Courses list when you first click on it
- Note: you can only display up to 12 of them at a time, and the remaining ones will stay hidden under My Courses
Add Course Materials (Assignments, Pages)
For information on adding Course Materials, visit Schoology's support page. For basic help on creating Assignments and Pages, follow these steps below:
- Click on Courses in Schoology
- Open your course page
- Click on Add Materials
- Here you can Add Assignment, Add Page, and other types of content. If you want to add anything on your Schoology page, this is where you start!
- Give your assignment a Title and Description, and attach Files or other Media that you may want students to see
- To embed YouTube videos, follow these instructions here: GIF Tutorial YouTube.gif
- To record and attach media (audio and webcam video) you can use Schoology's HTML 5 Recorder
Assignment Due Dates and Times
For Assignments, make sure to add a due date and due time. There are a couple of options to consider...
"11:59pm the night before"
- If you make this choice, there will be fewer changes to make as this is the default time; will mark students' work late if completed before class on the due date.
"8:25am the day of"
- Allows you to use a consistent time; will mark students' work late if completed before class on the due date.
"Class start time"
- Requires you to change the time every day, dependent on the class schedule
"3:30 the day of"
- Allows you to use a consistent time; will not flag late work if completed after class and before 3:30
Assignment Tips
Toggle Assignment Submissions
Do you want to accept student work digitally?
- No: Uncheck the Submissions Button and make sure it says Submission Disabled
- Yes: Make sure the Submissions Button says Submissions Enabled
Grade Assignments in Schoology
Do you want to record grades in Schoology for this assignment?
- No: Set Category to Ungraded
- Yes: Set the Category, either existing or new
Create Google Drive Assignment
Start with this article. If you still need help, continue reading below.
Google Drive Assignments allow all of your students to start with a copy of a template you create. Think of this as a worksheet you want your students to fill out, or a common writing prompt your class is supposed to complete.
- Create a Google Doc representing the assignment in your school Google Drive. Make sure to log in with your Riverdale username and passphrase.
- Follow these steps to attach that document to your assignment in Schoology. Remember, students will individually receive copies of that document that they can work on. These will also show up in Schoology and your Google Drive automatically.
If you have questions about this, reach out to a member of the Tech Team.
Create Kami Assignment
Kami Assignments allow all your students, especially those with touch-enabled devices (like Chromebooks), to annotate PDF's with handwriting, text boxes, and more.
- Create a PDF and store it in your Google Drive. Students will automatically receive copies of this PDF when they open the Kami Assignment.
- Click Courses in Schoology
- Open your course page
- Click on Add Materials
- Click on Add Assignment
- Give your assignment a Title and Description
- Click on the Kami button
- Click Continue with Google and log in with your Riverdale email address and passphrase
- Click Allow if this is the first time you're using Kami to give access to your Google Drive
- Find the PDF in your Google Drive, click your PDF, and click Select
- Click Create to finish creating your assignment
And that's it! If you have questions, reach out to a member of the Tech Team.
Change Course Settings
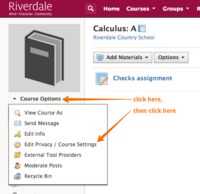
Once you've logged in, consider doing the following if you want to prevent students from seeing course materials until school starts. Under Course Options, select Edit Privacy / Course Settings, and then select Set Content Privacy Settings to No One. Make sure you change these back by start of school so students can see your course content! Feel free to create courses or groups and play around! You won't damage anything. Actual RCS Courses are typically auto-generated in late August.
Copy Previous Courses
This is only for ILS teachers Q2/Q4
Duplicating a course for use next year? Don't do this. You'll usually want to selectively copy course materials to Resources, organize them there, and copy them to a new course in the Fall. However, there are certain situations in which copying a course mid-year makes sense. Our ILS Q2/Q4 teacher swap is one of these. Follow these steps to duplicate a current course for use with other students than those currently auto-enrolled.
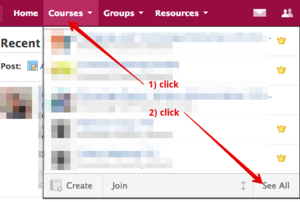
Click Courses and click See All
Click the Setting icon and click on Copy Section
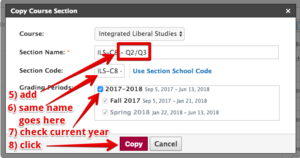
Change the relevant information according to the image below, and click Copy
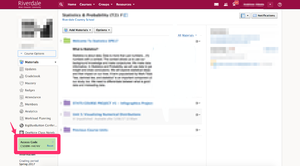
You might have a short delay before the course is available. Once it is, it'll show up as just another course with you as the teacher. You can click into it and manipulate it like any other course. You'll now need to manually enroll your students (Go to your Course Main Page and click Members in the left hand menu), or they'll need to use the Access Code to join. Go to any Course Main Page and get the code from the Green Access Code Box on the bottom left of the window. You can send this code to others to join your course/section.
Note: do not edit the name of your original course (e.g. C1 - Q1/Q3). Doing this will irreparably sever the very fabric of space-time and we might even need to reset your passphrase.
Bulk Edit Assignments
The Bulk Edit feature is located in the Gradebook and Materials Index. This feature allows you to adjust settings associated with graded assignments, tests/quizzes, and discussions from a single page.
To access Bulk Edit from the Gradebook, follow these steps:
- Click on the Courses link on the top banner
- Select one of your courses
- Click on Gradebook in the course menu
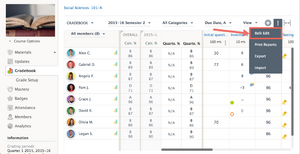
- Click on the Options Button (3 vertical dots)
- Select the Bulk Edit option from the dropdown menu
To access Bulk Edit from the Materials Index, follow these steps:
- Click on the Courses link in the top banner
- Select one of your courses
- Click on the Assignments Index or Tests/Quizzes Index
- Click on the Bulk Edit button near the top of the index
Join Course
To get access to another teacher's Schoology course, ask the course teacher to send you the course access code. The course access course can be found on the course's main page. It's 10 character code in a green box. After receiving the course access code. Select courses and click my courses (on the right corner) then select Join a Course and enter the access code.
Configure Notification Settings
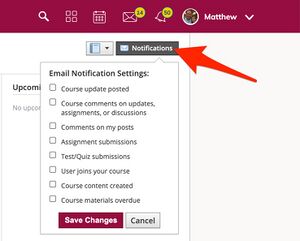
You can customize Schoology Notifications from the Notifications Button in the top right corner of each individual Course. The changes you make from the Notications button will only affect that particular Course's notifications to you. For this reason, it's useful for avoiding unwanted email notifications from the course(s) you're enrolled in as a result of your ECR.
More Schoology Resources for Teachers
This is a good (and quick) getting started guide.
Schoology's official help pages for teachers.
If you prefer video learning, go here
Students
Install the iOS or Android apps on your devices. To log in via iOS, select Riverdale Country School from the Sign in through my school menu and then click on Go to SSO to sign in with your Riverdale email address and passphrase.
Open Schoology
For MS/US
- Go to my.riverdale.edu
- Log in using your Riverdale username and passphrase
- Click on the Schoology icon
- You should then be logged in automatically.
Alternatively, you can also go directly to learning.riverdale.edu and Sign-in with Google
For LS
- Go to to Clever.com/in/riverdale
- Sign in using your Riverdale Google Credentials
- Once signed in to Clever, select the Schoology app
- Click Login with Google to sign in using your Riverdale email address and passphrase.
Courses and other info
Courses become visible a few days before school starts. For now, you might want to start customizing your profile.
In case you want more info: Schoology's official help page for students.
Reorder Courses List
- Click on Courses in Schoology
- Click on My Courses at the top right of the window
- Click Reorder courses on the right hand side of the window
- Click and drag courses to reorder them in the Courses list when you first click on it
- Note: you can only display up to 12 of them at a time, and the remaining ones will stay hidden under My Courses
Submit Audio and Video
Some assignments might ask you to record audio and or webcam video. To do this, use Google Chrome and follow these instructions from Schoology to use Schoology's HTML 5 recorder.
Submit Google Doc to Assignment
Follow these instructions to submit a Google Doc, Google Slide, or Google Sheet to an assignment in Schoology. To summarize some of the key steps:
- Open the assignment from Course Materials
- Click Submit Assignment
- Within the Upload window, select Resources
- Click Apps, and then Google Drive Resource App
- Search for your document using the search bar
- Check the box to the left of the item you wish to upload to the assignment
- Click Import and select Import File.
If you encounter any errors with this, please start with this article on fixing Google Drive in Schoology and if that still doesn't work, reach out to a member of the Tech Team.
Submit Kami Assignment
In your Schoology assignment, click on Open with Kami and complete your assignment. Once you are done, follow these instructions to submit your assignment for your class.
- Click on Turn in at the top of the Kami screen
- Click on Turn in again
- You should be taken back to Schoology
- Now click Submit and your assignment has been submitted.
If you have any questions about this, please let a member of the Tech Team know. You can find us at Help Desk in the cafeteria during breakfast and lunch.


