Create Google Appointment Calendars: Difference between revisions
Appearance
No edit summary |
Mvanmierlo (talk | contribs) No edit summary |
||
| (35 intermediate revisions by 2 users not shown) | |||
| Line 1: | Line 1: | ||
= | {{AboxNew | ||
| name = Create Google Appointment Calendars | |||
| learning = | |||
| instruction = x | |||
| community = x | |||
| summ = Google appointment calendars can facilitate scheduling meetings with community members on and off campus | |||
| maintained = MV | |||
| year = 2024-2025 | |||
}} | |||
__TOC__ | |||
== | == Make Google Appointment Calendars == | ||
Google appointment calendars allow you to create a sign-up calendar for meetings with students and community members. As other calendar invites (not appointment calendars) populate your calendar, your availability on your appointment calendar will update automatically. Follow these steps to get started: | |||
=== Create Appointment Calendar === | |||
# Create a '''''regular''''' '''''calendar event''''' on your [https://calendar.google.com Riverdale Google Calendar] | |||
# Click on '''''Appointment schedule''''' | |||
# Click on '''''Create a new appointment schedule''''' | |||
# Click on '''''Continue''''' | |||
=== | === Configure Appointment Calendar === | ||
# Give your appointment calendar a '''''title''''' under '''''Add title''''' (ex. ''Mr. van Mierlo's Extra Help Sign-up'') | |||
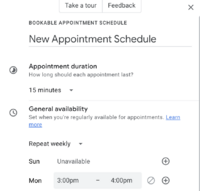
# Set your '''''Appointment duration''''' to the desired length | |||
# If you want this to repeat on a schedule (regardless of the 8-day rotation) choose either '''''Repeat weekly''''' or '''''Does not repeat''''' | |||
# Click the '''''+''''' next to the appropriate day to add availability or bookable times (ex. ''1:00PM - 3:00PM)'' | |||
#* You don't need to worry about your class schedule or other meetings | |||
#* Anything that is already booked on your calendar will NOT appear on the appointment calendar as an available time | |||
# Click on '''''Booked appointment settings''''' | |||
# If you want to add a buffer time around your appointments (ex. ''5 minutes before and after'') check the box under '''''Buffer time''''' and adjust the settings | |||
# Change any other settings you need to, and click '''''Next''''' | |||
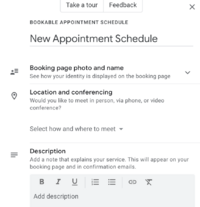
# Add a descriptions in the '''''Description''''' field | |||
# Change any other settings you need to, and click '''''Save''''' | |||
{| class="wikitable" | |||
|+ | |||
!Part 1 | |||
!Part 2 | |||
|- | |||
|[[File:Part 1 - Appointment Schedule.png|200x200px]] | |||
|[[File:Part 2 - Appointment Schedule.png|207x207px]] | |||
|} | |||
=== Share Appointment Calendar === | |||
# On your [https://calendar.google.com Riverdale Google Calendar], click on one of the '''''appointment windows''''' you scheduled for your appointment calendar | |||
# Click '''''Share''''' | |||
# Click '''''Link''''' | |||
# Click '''''Copy link''''' | |||
# Share the link with your students or colleagues. They will be able to book meetings easily this way! | |||
== Get More Help == | |||
If you still have any questions about this, you can always reach out to a member of the Tech Team or refer to Google's comprehensive support page to learn more about appointment calendars. [https://support.google.com/calendar/answer/10729749?hl=en Find Google's support article here.] | |||
== | |||
[ | |||
Latest revision as of 14:36, 5 August 2024
 | |
|---|---|
 | |
| Summary | Google appointment calendars can facilitate scheduling meetings with community members on and off campus |
| Author | Maintained by Matthijs van Mierlo |
| Help | Get help with this article |
| Status | Up-to-date for the 2024-2025 school year. |
Make Google Appointment Calendars
Google appointment calendars allow you to create a sign-up calendar for meetings with students and community members. As other calendar invites (not appointment calendars) populate your calendar, your availability on your appointment calendar will update automatically. Follow these steps to get started:
Create Appointment Calendar
- Create a regular calendar event on your Riverdale Google Calendar
- Click on Appointment schedule
- Click on Create a new appointment schedule
- Click on Continue
Configure Appointment Calendar
- Give your appointment calendar a title under Add title (ex. Mr. van Mierlo's Extra Help Sign-up)
- Set your Appointment duration to the desired length
- If you want this to repeat on a schedule (regardless of the 8-day rotation) choose either Repeat weekly or Does not repeat
- Click the + next to the appropriate day to add availability or bookable times (ex. 1:00PM - 3:00PM)
- You don't need to worry about your class schedule or other meetings
- Anything that is already booked on your calendar will NOT appear on the appointment calendar as an available time
- Click on Booked appointment settings
- If you want to add a buffer time around your appointments (ex. 5 minutes before and after) check the box under Buffer time and adjust the settings
- Change any other settings you need to, and click Next
- Add a descriptions in the Description field
- Change any other settings you need to, and click Save
| Part 1 | Part 2 |
|---|---|

|

|
- On your Riverdale Google Calendar, click on one of the appointment windows you scheduled for your appointment calendar
- Click Share
- Click Link
- Click Copy link
- Share the link with your students or colleagues. They will be able to book meetings easily this way!
Get More Help
If you still have any questions about this, you can always reach out to a member of the Tech Team or refer to Google's comprehensive support page to learn more about appointment calendars. Find Google's support article here.