Project in RCS Classrooms: Difference between revisions
Mvanmierlo (talk | contribs) No edit summary |
Mvanmierlo (talk | contribs) |
||
| Line 73: | Line 73: | ||
The Hill Multi Purpose Rooms are primarily used as a single meeting space with two projectors and screens displaying a single presentation source connected to one of three possible input panels on the West, Center and East locations; or through Apple TV. The MPR can be divided into two separate meeting spaces with full AV. The West panel, nearest the main entrance door, is most frequently used to connect devices for full MPR presentations, although it is possible to have each projector display a separate presentation from either of the other two input panels with the room configured as one space. | The Hill Multi Purpose Rooms are primarily used as a single meeting space with two projectors and screens displaying a single presentation source connected to one of three possible input panels on the West, Center and East locations; or through Apple TV. The MPR can be divided into two separate meeting spaces with full AV. The West panel, nearest the main entrance door, is most frequently used to connect devices for full MPR presentations, although it is possible to have each projector display a separate presentation from either of the other two input panels with the room configured as one space. | ||
=== | === Use MPR Touch Screens === | ||
Touch | Touch screens West and East are adjacent to each entrance, and either can be used to control both sides of the room. The touch screen will usually be dark if it has not been used for a short amount of time. Tap the touch screen and the RCS logo will appear. Touch again and you should be presented with a row of persistent icons on the left side: '''Video Sources''', '''Mic Volume''', '''Tech Tools''', and '''Off?'''. On the right side is a persistent '''MPR Full''' volume slider which adjusts the overall volume level in both rooms, and displays the current time and date. | ||
*''Video Sources'' | *''Video Sources'' | ||
Revision as of 15:47, 16 November 2023
 | |
|---|---|
 | |
| Summary | Connect your device to RCS projectors and displays |
| Author | Maintained by Derek Smith |
| Help | Get help with this article |
| Status | in need of review. |
Basic Classroom AV Setup
AV setup in Riverdale classrooms and other indoor teaching/conference spaces allow you to connect your USB-C laptop to use:
- Audio/video & interactivity link with a compatible Epson Brightlink projector and the classroom speakers
- Audio-in connections from the classroom microphones
- Charging power for your laptop
Use Classroom Anker Hub
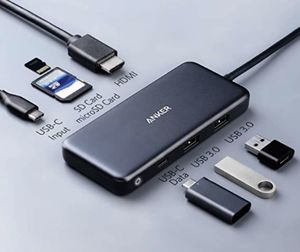
Every classroom at Riverdale has an Anker Hub that allows you to connect your USB-C device and project to either the projector or TV in that space. Refer to the image below for what the cables on the Anker Hub are used for.
- To project, simply plug in the long-braided USB-C cable into your Riverdale laptop
- If you need to use a microphone, use this article on classroom microphones to make sure the microphone and computer are setup properly and connected to the Anker Hub
- If audio is playing through the speakers properly, or if the video is choppy, grainy, or lagging
- Check your input and output settings
- Un-plug the USB-C power input (shorter non-braided cable on the Anker Hub) and plug it back in again
Wall Plate Diagram
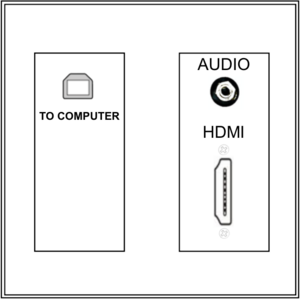
All physical connections to projectors and speakers are done through a wall plate. You can also connect to most classrooms' and larger AV installations through AppleTV.
Here's a diagram of a wall plate in most classrooms.
Some older wall plates may have a vestigial VGA port which may or may not work. Wall plates installed after 2017 will not have a VGA port. Please use the connection cable bundles with the HDMI cable & dongle appropriate for your computer, ChromeBook, tablet or iPhone.
Use Apple TV AirPlay
Most classrooms at Riverdale have Apple TV's connected to the projectors. This allows teachers and students to wirelessly project their macOS, iOS, or ipadOS devices to the projector.
- Click Source on the projector remote until you see the Apple TV name
- AirPlay using your iOS or iPadOS device or macOS device
If you don't see the proper Apple TV, try following these steps:
- Restart your device
- Toggle the WiFi on your device Off and then On again
- Ask the Tech Department to restart the Apple TV
- If all else fails, submit a Tech Ticket so that we can help!
Change Sound Input/Output Settings
On macOS
- Open System Settings
- Click Sound
- Click Click Output and select the projector/screen you want to output to
- Click Input and select the microphone source you want to use
On Windows 11
- TODO ADD INSTRUCTIONS HERE
Common Input/Output Audio Devices
- Epson PJ
- Samsung
- Blue Snowball
- DisplayPort (SAMSUNG)
Connecting to the Projectors in the Multi Purpose Rooms (MPR)
The Hill Multi Purpose Rooms are primarily used as a single meeting space with two projectors and screens displaying a single presentation source connected to one of three possible input panels on the West, Center and East locations; or through Apple TV. The MPR can be divided into two separate meeting spaces with full AV. The West panel, nearest the main entrance door, is most frequently used to connect devices for full MPR presentations, although it is possible to have each projector display a separate presentation from either of the other two input panels with the room configured as one space.
Use MPR Touch Screens
Touch screens West and East are adjacent to each entrance, and either can be used to control both sides of the room. The touch screen will usually be dark if it has not been used for a short amount of time. Tap the touch screen and the RCS logo will appear. Touch again and you should be presented with a row of persistent icons on the left side: Video Sources, Mic Volume, Tech Tools, and Off?. On the right side is a persistent MPR Full volume slider which adjusts the overall volume level in both rooms, and displays the current time and date.
- Video Sources
When the MPR is being used as a single meeting space, the Video Sources command screen will indicate Rooms are in Combined Mode. Underneath this legend are five icons, West Panel, Center Panel, East Panel, West Apple TV, and East Apple TV. Underneath these icons are three zones: West Screen zone to the left, East Screen zone to the right, with Rear HDMI Plate zone centered below them. If you are presenting from the customary location using a cabled connection near the main (West) doorway, touch and hold-drag the West Panel icon into all three zones. To project just to the West screen, omit dragging the icon to the East Screen zone. If you have a macOS laptop or a iPhone/iPad, you can connect using AirPlay to the West and East Apple TV sources in the same manner as cabled connections.
- Mic Volume
The MPR has five wireless microphones: three handhelds, one for each side, with an alternate; and two podium or table-top mics. The mics are found in the silver cart near the West entrance. Each mic has a separate control strip comprising volume down/up and mute buttons with a horizontal blue individual level meter.
Note: under most conditions, the use of microphones is not necessary. If mics are used by students, please inform them of their responsibility to respect the integrity of the equipment.
- Tech Tools
This screen is mostly for advanced users. Each projector can powered on/off and each screen can be raised/lowered independently. The panel brightness can be adjusted. Lastly, menu commands for the Apple TVs can be entered. Please do not use this panel unless instructed to do so by a member of the Tech Department.
- Off?
This panel is the last place you visit before disconnecting your device from the system. When you are done presenting, please tap the Confirm System Off button. This will turn the projector(s) off and raise the the screen(s). If you ever enter the MPR and you find the screens down and the projectors dark, turn the system off before connecting your device, then select the video source you need to use.

