Use Zoom Video Conferencing for Remote Learning?: Difference between revisions
| Line 42: | Line 42: | ||
[[File:In meeting Chat.jpg|thumbnail|alt=|none]] <br clear="all"> | [[File:In meeting Chat.jpg|thumbnail|alt=|none]] <br clear="all"> | ||
== Annotating and Sharing Controls == | == Annotating and Sharing Controls == | ||
'''Annotation tools''' | |||
You will see these annotation tools: | |||
[[File:Annotation-controls.png|thumbnail|alt=|none]] <br clear="all"> | |||
Note: The Select, Spotlight, and Save options are only available if you started the shared screen or whiteboard. | |||
Mouse: Deactivate annotation tools and switch to your mouse pointer. This button is blue if annotation tools are deactivated. | |||
Select (only available if you started the shared screen or whiteboard): Select, move, or resize your annotations. To select several annotations at once, click and drag your mouse to display a selection area. | |||
Text: Insert text. | |||
Draw: Insert lines, arrows, and shapes. | |||
Note: To highlight an area of the shared screen or whiteboard, select following square or circle icon to insert a semi-transparent square or circle. | |||
'''Accessing annotation tools if you started screen sharing''' | '''Accessing annotation tools if you started screen sharing''' | ||
After sharing your screen or whiteboard, annotation controls will display. If you don't see the annotation tools, click Annotate (if you are sharing your screen) or Whiteboard (if you are sharing a whiteboard). | After sharing your screen or whiteboard, annotation controls will display. If you don't see the annotation tools, click Annotate (if you are sharing your screen) or Whiteboard (if you are sharing a whiteboard). | ||
Revision as of 21:19, 24 March 2020
| Zoom is a remote conferencing program similar to Google Hangouts Meet. It provides a remote learning service that provides audio, video, content sharing, annotation, video clip sharing, breakout rooms, polling, recording and more. | |
| Intended for Employees and Students | |
| Categorized under Classroom technology and systems | |
| Maintained by Matt Ringh | |
| in need of review. |
Zoom is a remote conferencing program which provides a remote learning service that combines video conferencing, online meetings, chat, content sharing, and mobile collaboration.
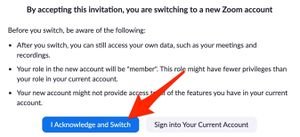
If you have an existing Zoom account, follow these instructions to switch to RCS's new account
Those of you who have an existing (free) Zoom account, please follow these instructions to switch it to Riverdale's new Zoom account.
- Click the link in the email invitation to join our Riverdale Zoom community
- Login to Zoom
- When prompted select to switch to our community!
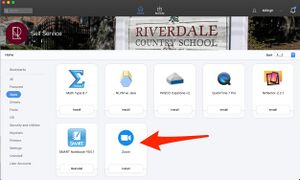
Installing Zoom on Mac (via Self Service)
If you're new to Zoom, and you're using a Mac Laptop, you can install Zoom through Self Service. If you don't have Self Service on your Mac, read this article for instructions on how to enroll.
New to Zoom (Windows) - Installing Zoom
Scheduling a Zoom Meeting within your RCS Google Calendar
https://chrome.google.com/webstore/detail/zoom-scheduler/kgjfgplpablkjnlkjmjdecgdpfankdle?hl=en-US
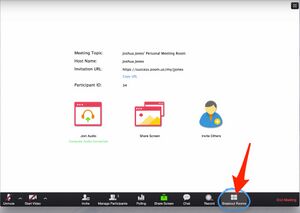
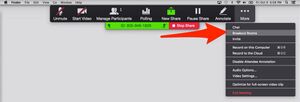
Breakout Rooms
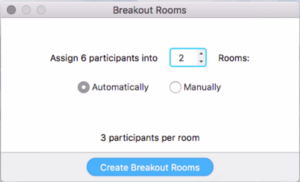
If you're sharing your screen, the option for Breakout Rooms can be found by clicking "More" at the top of your screen.
At this point, all the participants are still in the main meeting. You will see a pop up window which will allow you to Choose the number of Groups.
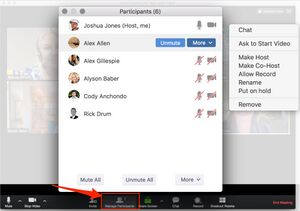
Participant and Meeting Management
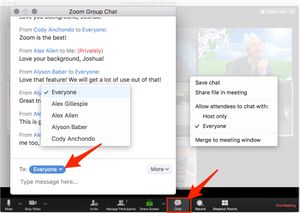
In Meeting Chat
Annotating and Sharing Controls
Annotation tools You will see these annotation tools:
Note: The Select, Spotlight, and Save options are only available if you started the shared screen or whiteboard.
Mouse: Deactivate annotation tools and switch to your mouse pointer. This button is blue if annotation tools are deactivated. Select (only available if you started the shared screen or whiteboard): Select, move, or resize your annotations. To select several annotations at once, click and drag your mouse to display a selection area. Text: Insert text. Draw: Insert lines, arrows, and shapes. Note: To highlight an area of the shared screen or whiteboard, select following square or circle icon to insert a semi-transparent square or circle. Accessing annotation tools if you started screen sharing After sharing your screen or whiteboard, annotation controls will display. If you don't see the annotation tools, click Annotate (if you are sharing your screen) or Whiteboard (if you are sharing a whiteboard).
Accessing annotation tools if you are viewing a shared screen Here's how students can annotate your screen while you're presenting, or vice versa. While viewing a shared screen or shared whiteboard, click View Options > Annotate at the top.
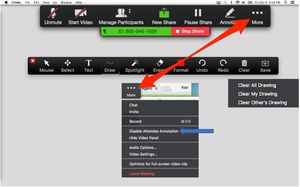
Enabling/Disabling Participant Annotation The picture below shows how you can allow participants to annotate your screen.
