Edit Guide: Difference between revisions
Mvanmierlo (talk | contribs) No edit summary |
Mvanmierlo (talk | contribs) No edit summary |
||
| Line 7: | Line 7: | ||
==Writing your article== | ==Writing your article== | ||
Each howdoi page should answer a question (ex. How do I find a list of Riverdale Google Calendars). This is so that articles stayed focused on the question at hand. | Each howdoi page should answer a question (ex. How do I find a list of Riverdale Google Calendars). This is so that articles stayed focused on the question at hand and provides only the necessary information. | ||
# Each article starts with an <code><nowiki>{{abox}}</nowiki></code> template. Update the template accordingly and make sure the fields '''''cat1''''' and '''''cat2''''' are appropriately filled in. | |||
::<nowiki>[[File:Interesting cal.png|thumbnail]]Here's a picture of what you should do<br clear="all"></nowiki> | # Use the '''''Heading''''' styling ( ^ 2 ) for major section titles. If a sub-section is needed, then use '''''Sub-heading 1''''' ( ^ 3 ). | ||
# Use '''''Paragraph''''' ( ^ 0 ) mode for other text. | |||
::[[File:Interesting cal.png|thumbnail]]Here's a picture of what you should do<br clear="all"> | # If you refer to a menu item or UI element for the intended user to interact with, then '''''bold and italicize'''''. This is to make the article easy navigable, so that the key steps are easy to find at a first glance without getting lost in the text. | ||
# If the user needs to type something in a textfield or text area, then "place the text in quotation marks". | |||
# Include images that you think are necessary, but also remember the following: the more images you include in your article, the harder it will be to update content when UI's and OS's change. | |||
# If you want to include images, make sure to un-check the '''''Wrap text around this item''''' box. Images, as a rule of thumb, should not exceed a width of 500 pixels unless there is a good reason to do so. | |||
# If you think it would be useful for the article, feel free to add a <code><nowiki>{{Category}}</nowiki></code> tag to include a list of related articles. Some common categories includes... | |||
#* <code><nowiki>{{RCS Software and Services}}</nowiki></code> | |||
#* <code><nowiki>{{Classroom Technology and Systems}}</nowiki></code> | |||
#* <code><nowiki>{{Veracross}}</nowiki></code> | |||
#* <code><nowiki>{{Chromebook}}</nowiki></code> | |||
#* And others!<br> | |||
== In-line images (if needed) == | |||
::* <nowiki>[[File:Interesting cal.png|thumbnail]]Here's a picture of what you should do<br clear="all"></nowiki> which gives you this, including the open space before the next instruction:<br> | |||
::[[File:Interesting cal.png|thumbnail]]Here's a picture of what you should do<br clear="all"> plus you can alter the size of the images by adding "|100px" (or another size) as follows: | |||
::<nowiki>[[File:Interesting cal.png|thumbnail|100px]]</nowiki> | ::<nowiki>[[File:Interesting cal.png|thumbnail|100px]]</nowiki> | ||
:to get this: | :to get this: | ||
Revision as of 13:23, 23 May 2023
To make our resources easily navigable for community members, please follow these guidelines for creating, editing, and maintaining articles in our knowledge base. Each howdoi page should answer a question (ex. How do I find a list of Riverdale Google Calendars). This is so that articles stayed focused on the question at hand.
Before you begin writing your article
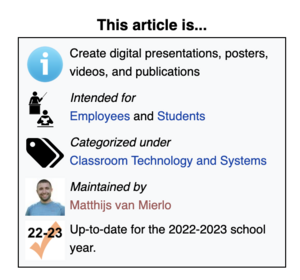
Every article should start with the {{abox}} template. With this template, you will fill in the following information to correctly categorize and maintain articles in our wiki.
To use this template, you can either start typing {{abox}} and then search for the "abox" template, or you can click here for the abox template. Once you copy and paste the code, click on Edit source, and then paste the block of text (for the template) at the top of your article.
Writing your article
Each howdoi page should answer a question (ex. How do I find a list of Riverdale Google Calendars). This is so that articles stayed focused on the question at hand and provides only the necessary information.
- Each article starts with an
{{abox}}template. Update the template accordingly and make sure the fields cat1 and cat2 are appropriately filled in. - Use the Heading styling ( ^ 2 ) for major section titles. If a sub-section is needed, then use Sub-heading 1 ( ^ 3 ).
- Use Paragraph ( ^ 0 ) mode for other text.
- If you refer to a menu item or UI element for the intended user to interact with, then bold and italicize. This is to make the article easy navigable, so that the key steps are easy to find at a first glance without getting lost in the text.
- If the user needs to type something in a textfield or text area, then "place the text in quotation marks".
- Include images that you think are necessary, but also remember the following: the more images you include in your article, the harder it will be to update content when UI's and OS's change.
- If you want to include images, make sure to un-check the Wrap text around this item box. Images, as a rule of thumb, should not exceed a width of 500 pixels unless there is a good reason to do so.
- If you think it would be useful for the article, feel free to add a
{{Category}}tag to include a list of related articles. Some common categories includes...{{RCS Software and Services}}{{Classroom Technology and Systems}}{{Veracross}}{{Chromebook}}- And others!
In-line images (if needed)
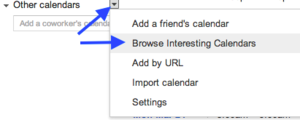
- [[File:Interesting cal.png|thumbnail]]Here's a picture of what you should do<br clear="all"> which gives you this, including the open space before the next instruction:
- [[File:Interesting cal.png|thumbnail]]Here's a picture of what you should do<br clear="all"> which gives you this, including the open space before the next instruction:
- Here's a picture of what you should do
plus you can alter the size of the images by adding "|100px" (or another size) as follows: - [[File:Interesting cal.png|thumbnail|100px]]
- to get this:
- Here's a tiny image. It's cheaper that way.
- Here's a tiny image. It's cheaper that way.
See this example/edit for source code examples.
Bottom of article - category templates
ONE of these should be placed at the very bottom of an article. Choose its main category.
- Don't list a secondary/specific category unless it's critical to show two sets of "other articles in this category" links.
- Do list a secondary/specific category for the subsets under the main categories below.
- {{Calendaring}}
- Adds Article to Category:Calendars and Scheduling, and inserts a list of other Articles in that Category.
- {{SS}}
- Adds Article to Category:Software and Services, and inserts a list of other Articles in that Category.
- {{ClassTech}}
- Adds Article to Category:Classroom technology and systems, and inserts a list of other Articles in that Category.
- {{Chromebooks}} (level 2, specific category)
- Adds Article to Category:Chromebooks, and inserts a list of other Articles in that Category.
- {{Communication}}
- Adds Article to Category:Communication, and inserts a list of other Articles in that Category.

