Create Google Appointment Calendars: Difference between revisions
Mvanmierlo (talk | contribs) No edit summary |
Mvanmierlo (talk | contribs) No edit summary |
||
| Line 10: | Line 10: | ||
__TOC__ | __TOC__ | ||
== | == Make Google Appointment Calendars == | ||
Google appointment calendars allow you to create a sign-up calendar for meetings with students and community members. As other calendar invites (not appointment calendars) populate your calendar, your availability on your appointment calendar will update appropriately. Follow these steps to get started: | |||
=== | === Create Appointment Calendar === | ||
# Create a '''''regular''''' '''''calendar event''''' on your Riverdale Google Calendar | |||
# Click on '''''Appointment schedule''''' | |||
# Click on '''''Create a new appointment schedule''''' | |||
# Click on '''''Continue''''' | |||
=== Configure Appointment Calendar === | |||
# Give your appointment calendar a '''''title''''' under '''''Add title''''' (ex. ''Mr. van Mierlo's Extra Help Sign-up'') | |||
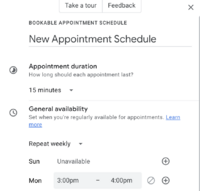
# Set your '''''Appointment duration''''' to the desired length | |||
# If you want this to repeat on a schedule (regardless of the 8-day rotation) choose either '''''Repeat weekly''''' or '''''Does not repeat''''' | |||
# Click the '''''+''''' next to the appropriate day to add availability or bookable times (ex. ''1:00PM - 3:00PM)'' | |||
#* You don't need to worry about your class schedule or other meetings | |||
#* Anything that is already booked on your calendar will NOT appear on the appointment calendar as an available time | |||
# Click on '''Booked appointment settings''' | |||
# If you want to add a buffer time around your appointments (ex. ''5 minutes before and after'') check the box under '''''Buffer time''''' and adjust the settings | |||
# Change any other settings you need to, and click '''''Next''''' | |||
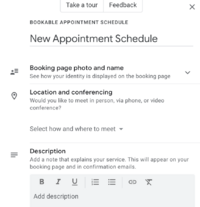
# Add a descriptions in the '''''Description''''' field | |||
# Change any other settings you need to, and click '''''Save''''' | |||
{| class="wikitable" | |||
|+ | |||
!Part 1 | |||
!Part 2 | |||
|- | |||
|[[File:Part 1 - Appointment Schedule.png|200x200px]] | |||
|[[File:Part 2 - Appointment Schedule.png|207x207px]] | |||
|} | |||
=== Share Appointment Calendar === | |||
# On your Google Calendar, click on one of the '''''appointment windows''''' you scheduled for your appointment calendar | |||
# Click '''''Share''''' | |||
# Click '''''Link''''' | |||
# Click '''''Copy link''''' | |||
# Share the link with your students or colleagues. They will be able to book events easily this way! | |||
===Create an appointment block=== | ===Create an appointment block=== | ||
Revision as of 19:27, 2 October 2023
 | |
|---|---|
 | |
| Summary | Google appointment calendars can facilitate scheduling meetings with community members on and off campus |
| Author | Maintained by Matthijs van Mierlo |
| Help | Get help with this article |
| Status | in need of review. |
Make Google Appointment Calendars
Google appointment calendars allow you to create a sign-up calendar for meetings with students and community members. As other calendar invites (not appointment calendars) populate your calendar, your availability on your appointment calendar will update appropriately. Follow these steps to get started:
Create Appointment Calendar
- Create a regular calendar event on your Riverdale Google Calendar
- Click on Appointment schedule
- Click on Create a new appointment schedule
- Click on Continue
Configure Appointment Calendar
- Give your appointment calendar a title under Add title (ex. Mr. van Mierlo's Extra Help Sign-up)
- Set your Appointment duration to the desired length
- If you want this to repeat on a schedule (regardless of the 8-day rotation) choose either Repeat weekly or Does not repeat
- Click the + next to the appropriate day to add availability or bookable times (ex. 1:00PM - 3:00PM)
- You don't need to worry about your class schedule or other meetings
- Anything that is already booked on your calendar will NOT appear on the appointment calendar as an available time
- Click on Booked appointment settings
- If you want to add a buffer time around your appointments (ex. 5 minutes before and after) check the box under Buffer time and adjust the settings
- Change any other settings you need to, and click Next
- Add a descriptions in the Description field
- Change any other settings you need to, and click Save
| Part 1 | Part 2 |
|---|---|
|
|
- On your Google Calendar, click on one of the appointment windows you scheduled for your appointment calendar
- Click Share
- Click Link
- Click Copy link
- Share the link with your students or colleagues. They will be able to book events easily this way!
Create an appointment block
Step 1 - Open Google Calendar.
Step 2 - Make sure that you're in Week view or any Day view.
Step 3 - Click anywhere in the calendar. In the event box that pops up, click Appointment slots.
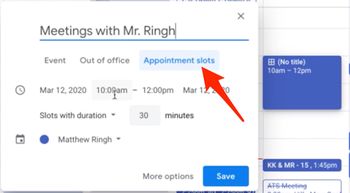
Step 4 - Enter the details, including a title, and the duration of slots (10 minutes, 15 minutes, etc...) which will be bookable.
Step 5 - To add more information, like a location or more detailed description, click More options.
- Tip: If you want to make the appointment block repeat, do so before you invite others to reserve a slot. When you make an existing appointment block with reserved slots repeat, the reserved slots get duplicated as new slots and double booking can occur.
Please don't Add guests to the appointment block!
- Pro Tip: Don’t add people who want to reserve an individual appointment slot. Instead, send them a link to the appointments page (see below).
How to Invite others to reserve an appointment slot
After you've set up the appointment block, you can invite people to reserve a slot with a link to your appointments page (a web page which shows all of your available appointment blocks).
Step 1 - Open Google Calendar.
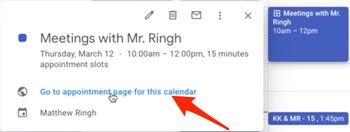
Step 2 - Click your appointment block and then Go to appointment page for this calendar.
Step 3 - Copy and paste the appointment page link from your browser.
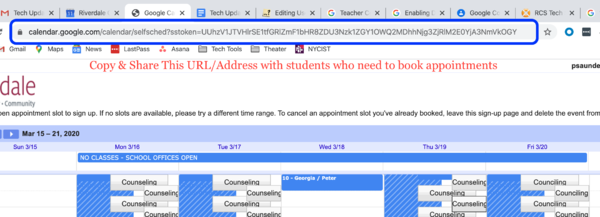
Step 4 - Post this link to Schoology, or send this link to people who want to reserve an appointment slot.
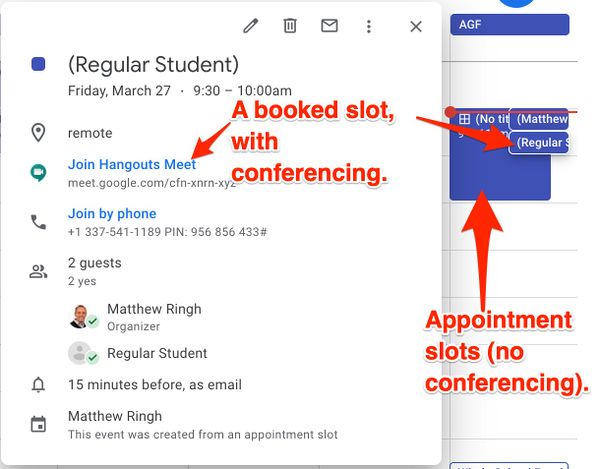
Important Note! The bookable appointment slots themselves won't show the option to "Join Google Meet", but once someone books an appointment with you the "Join Hangouts Meet" option will automatically appear in the booked calendar event.
The Student view
Students can now reserve your appointment slots with the link you sent them.
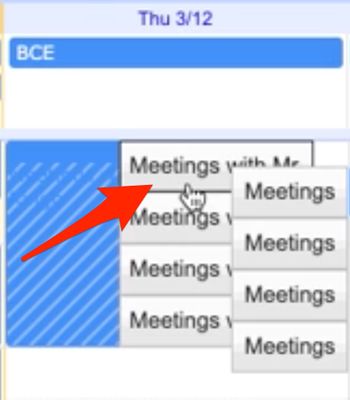
Students simply click on one of these silver appointment slots to create an appointment with you.
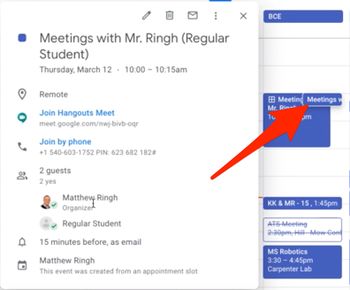
Once created, that appointment looks like any other event on your calendar and includes a Google Hangouts Meet link for conferencing. Each individual student's name is automatically added to the appointment they book, as in the picture below.
