Enable Zoom Screen Sharing on MacOS: Difference between revisions
No edit summary |
No edit summary |
||
| Line 14: | Line 14: | ||
[[File:System-preferences.gif|250 px]] | [[File:System-preferences.gif|250 px]] | ||
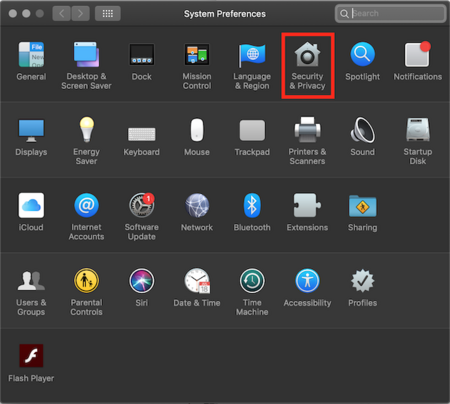
'''Step 2 - Click "Security and Privacy"''' | '''Step 2 - Click "Security and Privacy"''' | ||
[[File:Security and Privacy.png|450 px]] | [[File:Security and Privacy.png|450 px]] | ||
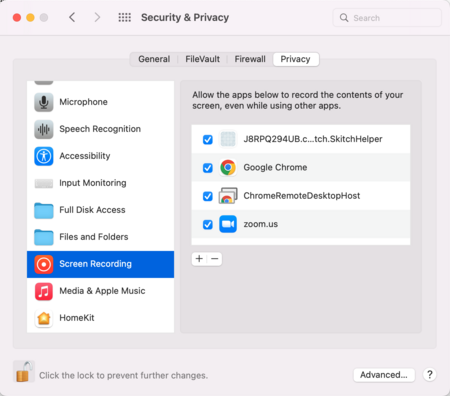
'''Step 3 - Click the PRIVACY TAB, and SCREEN RECORDING (from the left-hand menu), and check the box for ZOOM. You may need to click the lock in the lower-left-hand corner to make this change.''' | '''Step 3 - Click the PRIVACY TAB, and SCREEN RECORDING (from the left-hand menu), and check the box for ZOOM. You may need to click the lock in the lower-left-hand corner to make this change.''' | ||
[[File:Screen Recording new.png|450 px]] | [[File:Screen Recording new.png|450 px]] | ||
Revision as of 10:10, 22 September 2022
| Changing Settings to Allow Screen Sharing from Zoom. | |
| Intended for Employees and Students | |
| Categorized under Classroom Technology and Systems | |
| Maintained by Matt Ringh | |
| Up-to-date for the 2022-2023 school year. |
Step 1 - Open System Preferences
Step 2 - Click "Security and Privacy"
Step 3 - Click the PRIVACY TAB, and SCREEN RECORDING (from the left-hand menu), and check the box for ZOOM. You may need to click the lock in the lower-left-hand corner to make this change.


