Access SMART Notebook: Difference between revisions
No edit summary |
Mvanmierlo (talk | contribs) m (Mvanmierlo moved page Activate SMART Notebook to Access SMART Notebook) |
||
| (16 intermediate revisions by 2 users not shown) | |||
| Line 1: | Line 1: | ||
{{ | {{AboxNew | ||
| name = Access and Activate SMART Notebook | |||
| learning = | |||
| instruction = x | |||
| community = | |||
| summ = Request, install, and activate SMART Notebook | |||
| maintained = MV | |||
| year = 2023-2024 | |||
}} | }} | ||
== | == What is SMART Notebook? == | ||
If you're using, or looking to use, SMART Notebook software, we have licenses. Here's how you can request a Notebook license, install the software, and activate it. SMART Notebook is interactive software to use with Riverdale's interactive projectors. Using the included classroom pens, you can open a SMART Notebook file on your computer, connect your computer to the projector via USB-C, and then use the interactive digital pens directly on the whiteboard while projecting. Your writing will be digitally captured in the notebook and can be saved and exported in a variety of formats. | |||
== Activate or reactivate SMART Notebook == | |||
=== Installing SMART Notebook for the first time === | |||
====== For MacOS ====== | |||
# Please complete the "Technology Purchase or Upgrade Request" form found [https://form.asana.com/?hash=cce1b05135fe9331d7507c776696521dc266093187336f960bbe90ccc7aa4f6c&id=1154346820636856 here]. | |||
# Once approved, install '''''SMART Notebook 22.0 SP2''''' through '''''Self Service''''' on your school-issued computer. | |||
# After installing, open '''''Notebook''''' from your '''''Applications''''' folder | |||
# Click '''''Sign In''''' | |||
# Click on '''''Google''''' on the page that loads and sign-in with your '''''Riverdale email address''''' and '''''passphrase''''' | |||
# You have now activated SMART Notebook Pro and have access to all the features! | |||
====== For Windows: ====== | |||
# Please complete the "Technology Purchase or Upgrade Request" form found [https://form.asana.com/?hash=cce1b05135fe9331d7507c776696521dc266093187336f960bbe90ccc7aa4f6c&id=1154346820636856 here]. | |||
# Once approved, install the latest version '''''SMART Notebook''''' from this website on your school-issued computer: [https://www.smarttech.com/en/education/products/smart-notebook/notebook-download-form SMART Notebook download link]. | |||
# After installing, open '''''Notebook''''' by searching for it in the '''''Windows 11 Start Menu''''' | |||
# Click '''''Sign In''''' when prompted | |||
# Click on '''''Google''''' on the page that loads and sign-in with your '''''Riverdale email address''''' and '''''passphrase''''' | |||
# You have now activated SMART Notebook Pro and have access to all the features! | |||
=== Update existing SMART Notebook license === | |||
If you already have SMART Notebook installed, and you're seeing a banner warning of an approaching expiration date, here are the steps to take to activate our newer license: | |||
== | |||
' | |||
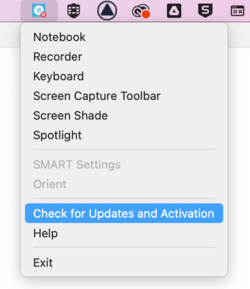
'''Step 1 -''' Click on the '''''SMART System Menu''''' button in your Menu bar (Mac), or in the Windows Notification Area (Windows). Select '''''Check for Updates and Activation'''''. | |||
[[File:1_SMART_System_Menu_-_Check_for_Updates.png|289x289px]] | |||
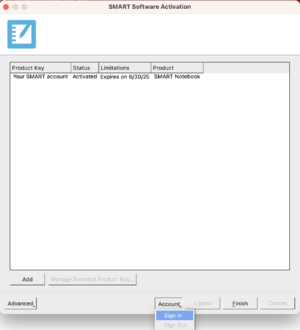
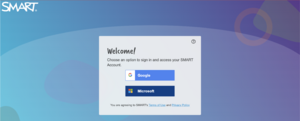
'''Step 2 -''' Select '''''Account''''' and then click '''''Sign-in'''''. Sign-in with your Riverdale email address in the web browser that pops up | |||
[[File:SmartNotebookSignIn.png|none|thumb|330x330px]] | |||
[[File:SMARTNotebookLogin.png|none|thumb|300x300px]] | |||
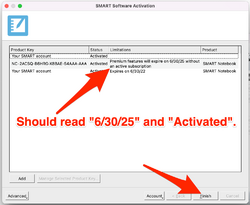
'''Step 5 -''' Confirm that it now reads "Activated", and click '''''Finish'''''. | |||
[[File:5_Activated_and_correct_date.png|250x250px]] | |||
Latest revision as of 11:00, 15 June 2023
 | |
|---|---|
| Summary | Request, install, and activate SMART Notebook |
| Author | Maintained by Matthijs van Mierlo |
| Help | Get help with this article |
| Status | Up-to-date for the 2023-2024 school year. |
What is SMART Notebook?
If you're using, or looking to use, SMART Notebook software, we have licenses. Here's how you can request a Notebook license, install the software, and activate it. SMART Notebook is interactive software to use with Riverdale's interactive projectors. Using the included classroom pens, you can open a SMART Notebook file on your computer, connect your computer to the projector via USB-C, and then use the interactive digital pens directly on the whiteboard while projecting. Your writing will be digitally captured in the notebook and can be saved and exported in a variety of formats.
Activate or reactivate SMART Notebook
Installing SMART Notebook for the first time
For MacOS
- Please complete the "Technology Purchase or Upgrade Request" form found here.
- Once approved, install SMART Notebook 22.0 SP2 through Self Service on your school-issued computer.
- After installing, open Notebook from your Applications folder
- Click Sign In
- Click on Google on the page that loads and sign-in with your Riverdale email address and passphrase
- You have now activated SMART Notebook Pro and have access to all the features!
For Windows:
- Please complete the "Technology Purchase or Upgrade Request" form found here.
- Once approved, install the latest version SMART Notebook from this website on your school-issued computer: SMART Notebook download link.
- After installing, open Notebook by searching for it in the Windows 11 Start Menu
- Click Sign In when prompted
- Click on Google on the page that loads and sign-in with your Riverdale email address and passphrase
- You have now activated SMART Notebook Pro and have access to all the features!
Update existing SMART Notebook license
If you already have SMART Notebook installed, and you're seeing a banner warning of an approaching expiration date, here are the steps to take to activate our newer license:
Step 1 - Click on the SMART System Menu button in your Menu bar (Mac), or in the Windows Notification Area (Windows). Select Check for Updates and Activation.
Step 2 - Select Account and then click Sign-in. Sign-in with your Riverdale email address in the web browser that pops up
Step 5 - Confirm that it now reads "Activated", and click Finish.


