Wireless Network/Connect from Android: Difference between revisions
Appearance
No edit summary |
No edit summary |
||
| Line 7: | Line 7: | ||
#Under CA Certificate choose '''Use System Certificates'''. Then, choose '''Do Not Verify''' for Online Certificate Status. | #Under CA Certificate choose '''Use System Certificates'''. Then, choose '''Do Not Verify''' for Online Certificate Status. | ||
#For Domain, write '''riverdale.edu''' | #For Domain, write '''riverdale.edu''' | ||
#Enter your username without @riverdale.edu where it says | #Enter your username without @riverdale.edu where it says '''Identity''' <u>(leave anonymous identity blank)</u> | ||
#Enter your domain Password on the password line | #Enter your domain Password on the password line | ||
#Click connect | #Click connect | ||
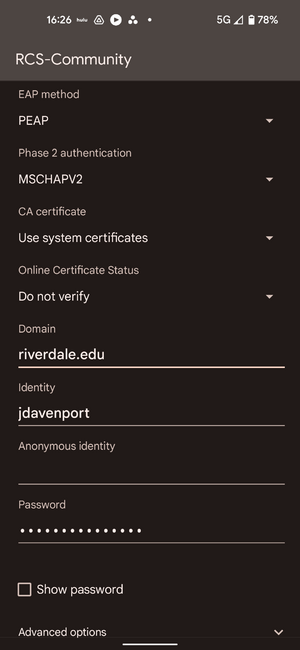
<br />[[File:2022 Android RCS-Community Settings.png|border|frameless]]<br /> | <br />[[File:2022 Android RCS-Community Settings.png|border|frameless]]<br /> | ||
Latest revision as of 20:52, 13 August 2024
- Go to Settings
- Choose Network & Internet
- Choose Internet
- Select RCS-Community from the list of wireless network names
- The EAP Method should be PEAP
- Leave Phase 2 Authentication as MSCHAPV2
- Under CA Certificate choose Use System Certificates. Then, choose Do Not Verify for Online Certificate Status.
- For Domain, write riverdale.edu
- Enter your username without @riverdale.edu where it says Identity (leave anonymous identity blank)
- Enter your domain Password on the password line
- Click connect
