Create Google Appointment Calendars: Difference between revisions
No edit summary |
|||
| Line 33: | Line 33: | ||
'''Step 2 -''' Click your appointment block and then '''''Go to appointment page for this calendar'''''. | '''Step 2 -''' Click your appointment block and then '''''Go to appointment page for this calendar'''''. | ||
[[File:APPOINTMENT2.jpg|thumbnail| | [[File:APPOINTMENT2.jpg|thumbnail|350px|alt=|left]] <br clear="all"> | ||
'''Step 3 -''' Copy and paste the appointment page link from your browser. | '''Step 3 -''' Copy and paste the appointment page link from your browser. | ||
[[File:Copy Share URL.png|thumbnail| | [[File:Copy Share URL.png|thumbnail|350px|alt=|left]] <br clear="all"> | ||
'''Step 4 -''' Post this link to Schoology, or send this link to people who want to reserve an appointment slot. | '''Step 4 -''' Post this link to Schoology, or send this link to people who want to reserve an appointment slot. | ||
| Line 41: | Line 41: | ||
<br /> | <br /> | ||
The Student view of the "Book Appointments" page looks like this: | The Student view of the "Book Appointments" page looks like this: | ||
[[File:APPOINTMENT3.jpg|thumbnail| | [[File:APPOINTMENT3.jpg|thumbnail|350px|alt=|left]] <br clear="all"> | ||
Students simply click on one of these silver appointment slots to create an appointment with you. Once created, that appointment looks like any other event on your calendar and includes a Google Hangouts Meet link for conferencing | Students simply click on one of these silver appointment slots to create an appointment with you. Once created, that appointment looks like any other event on your calendar and includes a Google Hangouts Meet link for conferencing. | ||
[[File:APPOINTMENT4.jpg|thumbnail| | Each individual student's name is automatically added to the appointment they book, as in the picture below. | ||
[[File:APPOINTMENT5.jpg|thumbnail| | [[File:APPOINTMENT4.jpg|thumbnail|350px|alt=|left]] <br clear="all"> | ||
[[File:APPOINTMENT5.jpg|thumbnail|350px|alt=|left]] <br clear="all"> | |||
Revision as of 08:25, 12 March 2020
Video Tutorial on Setting up Remote Learning Appointment Slots
Here's a link to a video which reviews how to set up Google Calendar Appointment Slots. Each bookable slot then has a Google Meet in it, so students can book time to meet with you 1:1 during a period of remote learning. The video also shows how you might share the appointment calendar with your students, and shows what the process looks like to students.
How appointment slots relate to regular events
Appointment slots in Google Calendar allow users to offer specific, limited hours during which they can be booked by students (or adults) with whom they have shared the link to their appointment slot web page.
When you create a block of appointment slots, the block initially shows up as a single event on your calendar. To confirm that an event is an appointment block, at the upper left corner of the event, find the Appointment block Appointment. ![]()
When someone reserves one of your appointment slots, the reserved slot shows up as an event on your calendar, and theirs.
Create an appointment block
Step 1 - Open Google Calendar.
Step 2 - Make sure that you're in Week view or any Day view.
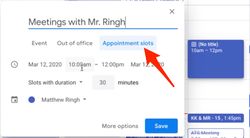
Step 3 - Click anywhere in the calendar. In the event box that pops up, click Appointment slots.
Step 4 - Enter the details, including a title, and the duration of slots (10 minutes, 15 minutes, etc...) which will be bookable.
Step 5 - To add more information, like a location or more detailed description, click More options.
- Tip: If you want to make the appointment block repeat, do so before you invite others to reserve a slot. When you make an existing appointment block with reserved slots repeat, the reserved slots get duplicated as new slots and double booking can occur.
Don't Add guests to the appointment block!
- Tip: Don’t add people who want to reserve an individual appointment slot. Instead, send them a link to the appointments page (see below).
Invite others to reserve an appointment slot
After you've set up the appointment block, you can invite people to reserve a slot with a link to your appointments page (a web page which shows all of your available appointment blocks).
Step 1 - Open Google Calendar.
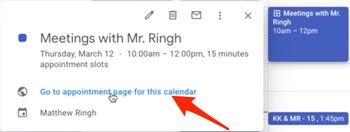
Step 2 - Click your appointment block and then Go to appointment page for this calendar.
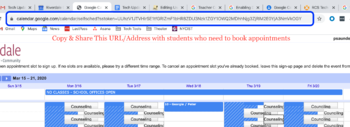
Step 3 - Copy and paste the appointment page link from your browser.
Step 4 - Post this link to Schoology, or send this link to people who want to reserve an appointment slot.
Students can now reserve your appointment slots with Google Calendar.
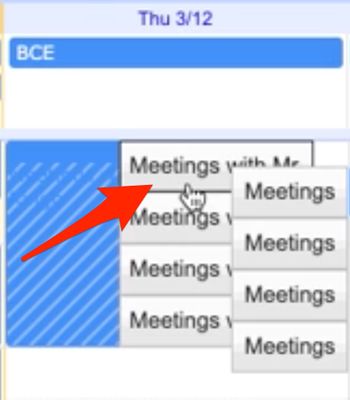
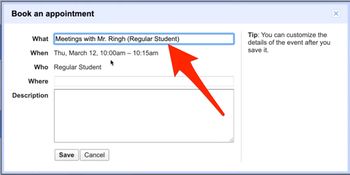
The Student view of the "Book Appointments" page looks like this:
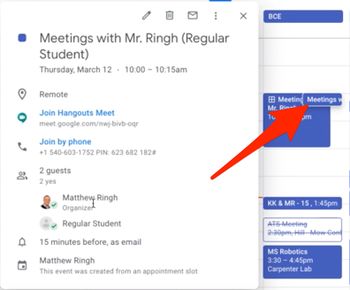
Students simply click on one of these silver appointment slots to create an appointment with you. Once created, that appointment looks like any other event on your calendar and includes a Google Hangouts Meet link for conferencing. Each individual student's name is automatically added to the appointment they book, as in the picture below.
